<?xml version="1.0" encoding="utf-8"?>
<feed xmlns="http://www.w3.org/2005/Atom" xmlns:dc="http://purl.org/dc/elements/1.1/" xmlns:thr="http://purl.org/syndication/thread/1.0">
    <title>RADIO KITS IN JA　: TX-1 真空管式 2球AMワイヤレス　マイクキット</title>
    <link rel="self" type="application/atom+xml" href="http://www.radiokits.jp/radio_kit_/tx1_2/atom.xml" />
    <link rel="alternate" type="text/html" href="http://www.radiokits.jp/radio_kit_/" />
    
    <id>tag:app.dcnblog.jp,2003:weblog-358158</id>
    <updated>2016-06-14T18:10:00+09:00</updated>
    <subtitle>信州安曇野発アナログラジオ工作中心blogです。ラジオ自作派にお手伝い用基板１、基板2、基板3、基板4を領布中
 6Z-DH3Aのヒーターピンは必ず1番を接地。間抜けは6番ピンを接地する　　6Z-DH3Aのピン　接続情報 　amazon等での転売shopが多数ありますが、私とは無関係です。騙されぬようにご注意ください。トランジスタラジオキット,真空管短波ラジオ、真空管レフレックスラジオ、AMワイヤレスマイク、FMワイヤレスマイク、12AU7ダイレクトコンバージョン製作。LC7265ラジオ周波数表示器、ミニワッター、トランジスタアンプ、スピーカーの鳴る単球ラジオなど計 609例。 真空管ラジオ修理記やFMチューナー修理記など。20代は半導体ラジオ修理技術者でした。FA機械設計屋を35年やってます。画像多数にてPC推奨します。 資料画像等はお持ち帰りいただいてOKです。記事にする折には、ご一報ください。
since 2011/Aug</subtitle>
    <entry>
        <title>グリッド・リーク再生検波　考</title>
        <link rel="alternate" type="text/html" href="http://www.radiokits.jp/radio_kit_/2016/06/post-4bb4.html" />
        <link rel="replies" type="text/html" href="http://www.radiokits.jp/radio_kit_/2016/06/post-4bb4.html" thr:count="0" />
        <id>tag:app.dcnblog.jp,2003:post-57208797</id>
        <published>2016-06-14T18:10:00+09:00</published>
        <updated>2016-08-02T21:38:37+09:00</updated>
        <summary>民主党政権時代に最低賃金を1000円に上げようとしたが、それを潰したのは自民党様...</summary>
        <author>
            <name>takinx</name>
        </author>
        <category scheme="http://www.sixapart.com/ns/types#category" term="1-V-2 高一再生式グリッド・リーク検波　ST管3球ラジオ" />
        <category scheme="http://www.sixapart.com/ns/types#category" term="1R-STD 単球　再生式ラジオキット" />
        <category scheme="http://www.sixapart.com/ns/types#category" term="1RW-DX    単球　再生式ラジオキット　(6EH8)" />
        <category scheme="http://www.sixapart.com/ns/types#category" term="3S-STD 真空管　3球スーパーラジオキット   " />
        <category scheme="http://www.sixapart.com/ns/types#category" term="7Mhz  CWトランシーバーキット　CRK-10A" />
        <category scheme="http://www.sixapart.com/ns/types#category" term="Genny unit 01 (再生式ラジオ)" />
        <category scheme="http://www.sixapart.com/ns/types#category" term="TX-1 真空管式 2球AMワイヤレス　マイクキット" />
        <category scheme="http://www.sixapart.com/ns/types#category" term="アイテック電子研究所 新SR-7  7Mhz レシーバーキット" />
        <category scheme="http://www.sixapart.com/ns/types#category" term="サトー電気　　7Mhz　ダイレクトコンバージョンキット" />
        <category scheme="http://www.sixapart.com/ns/types#category" term="マルツエレック MRX-7D-FK 7MHzレシーバキット　" />
        <category scheme="http://www.sixapart.com/ns/types#category" term="レフレックス +再生　1球 真空管ラジオ (6GH8)" />
        <category scheme="http://www.sixapart.com/ns/types#category" term="真空管ラジオ　GT管　中波＆短波　2バンド　6号機" />
        <category scheme="http://www.sixapart.com/ns/types#category" term="真空管ラジオ　ST管　中波＆短波　5球スーパー　3号機" />
        <category scheme="http://www.sixapart.com/ns/types#category" term="真空管ラジオ　再生式3球(6688+6688+6LF8)" />
        <category scheme="http://www.sixapart.com/ns/types#category" term="真空管ラジオ　電池管　2球レフレックスラジオ" />
        <category scheme="http://www.sixapart.com/ns/types#category" term="真空管ラジオ　高1中1　　4球スーパー　  (6688,6BY6,6GH8,6AQ5)" />
        <category scheme="http://www.sixapart.com/ns/types#category" term="真空管ラジオキット(COSMOS) 中・短波　7球　2バンド 　スプリッドバリコン式" />
        <category scheme="http://www.sixapart.com/ns/types#category" term="録録　★" />
        
        
<content type="html" xml:base="http://www.radiokits.jp/radio_kit_/">
<![CDATA[
<div xmlns="http://www.w3.org/1999/xhtml"><p>民主党政権時代に最低賃金を1000円に上げようとしたが、それを潰したのは自民党様です。覚えておいででしょう。　色々な幹部の方が、1000円賃金を批判してましたね。もし忘れているなら痴呆症を疑ったほうが御体の為です。</p>
<p>現政権は、さて批判したのにも係らず最低賃金を1000円したいらしいですね。まあ一貫性がないがな。</p>
<p></p>
<p></p>
<p>＊＊＊＊＊＊＊＊＊＊＊＊＊＊＊＊＊＊＊＊＊＊＊＊＊＊＊＊＊＊</p>
<p></p>
<p></p>
<p>検索エンジンで「グリッド・リーク検波」を<a target="_self" href="http://search.yahoo.co.jp/search?p=%E9%AB%98%E4%B8%80%E5%86%8D%E7%94%9F%E5%BC%8F%E3%82%B0%E3%83%AA%E3%83%83%E3%83%89%E3%83%BB%E3%83%AA%E3%83%BC%E3%82%AF%E6%A4%9C%E6%B3%A2&amp;ei=UTF-8">調べると</a>　上位にオイラの記事が来て、とてもビックリしている。　枯れた技術なので、大方の「真空管ラジオの本」には説明文が載っている。</p>
<p>そのような情報は、①先ずは、本を手に入れて読む。②そして自分の手で造って確認する。③そして真偽を検討すればよい。</p>
<p>
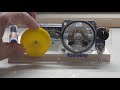
再生式ラジオは受信中にデジタル表示できる。そりゃ当然のことだ。</p>
<p class="youtube" title="YouTube: はいぶりっどラジオ　1-V-2  デジタル表示"><img src="https://i.ytimg.com/vi/3kzOijxjVzA/default.jpg?w=425&amp;h=355&amp;player=1" alt="はいぶりっどラジオ　1-V-2  デジタル表示" /> <br /> <a class="title" href="http://jp.youtube.com/watch?v=3kzOijxjVzA" target="_blank">YouTube: はいぶりっどラジオ　1-V-2 デジタル表示</a></p>
<p><strong>この1-V-2の製作記事は<a target="_self" href="http://takinx.dcnblog.jp/radio_kit_/radio_82/">これ</a>。</strong></p>
<p>
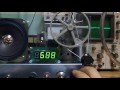
再生式ラジオの再生状態をLEDカウンターから見ると、</p>
<p>強く発振していると　表示する。</p>
<p>弱く発振していると数字がちららちしている。　だが音声がまともに聞こえるのでこれが再生状態だ。(カウンターで検出できる程度の発振強度状態だ)</p>
<p>①「バリコン<span style="font-size: x-large;"><strong>　⇔</strong></span>グリッド抵抗」にオシロプローブをあてた。</p>
<p class="youtube" title="YouTube: バリコン　⇔グリッドにオシロプローブ"><img src="https://i.ytimg.com/vi/smZV6JdSP_Q/default.jpg?w=425&amp;h=355&amp;player=1" alt="バリコン　⇔グリッドにオシロプローブ" /> <br /> <a class="title" href="http://jp.youtube.com/watch?v=smZV6JdSP_Q" target="_blank">YouTube: バリコン　⇔グリッドにオシロプローブ</a></p>
<p></p>
<p>SG電圧の増減でオシロの波形が大小する。VRを絞ると横線状態になる。SG電圧で発振強度がコントロールできることを示している。発振振幅も安定している。自動制御が効かない発振ならば暴走状態になるが、アンダーコントールできる。</p>
<p>波形はよく見かける波形。</p>
<p>②LED式表示器への　信号引出し点での波形。</p>
<p class="youtube" title="YouTube: 再生ラジオの「表示器への信号取り出し点」波形"><img src="https://i.ytimg.com/vi/NsqC6nz2VsM/default.jpg?w=425&amp;h=355&amp;player=1" alt="再生ラジオの「表示器への信号取り出し点」波形" /> <br /> <a class="title" href="http://jp.youtube.com/watch?v=NsqC6nz2VsM" target="_blank">YouTube: 再生ラジオの「表示器への信号取り出し点」波形</a></p>
<p></p>
<p>グリッド側で引き出すよりは弱い。JH4ABZ式LED表示器はこのレベル程度入力でも計測するので優れものだと想う。　</p>
<p>グリッド側で取り出すとLC共振回路にお邪魔な負荷が吊り下がり、Qが下がるのでお薦めはしない。</p>
<p></p>
<p>③ベストな再生状態を探る。SP端にオシロを接続し受信音を波形で計測。</p>
<p class="youtube" title="YouTube: ベストな再生点"><img src="https://i.ytimg.com/vi/4ygF3EefXlU/default.jpg?w=425&amp;h=355&amp;player=1" alt="ベストな再生点" /> <br /> <a class="title" href="http://jp.youtube.com/watch?v=4ygF3EefXlU" target="_blank">YouTube: ベストな再生点</a></p>
<p class="youtube" title="YouTube: ベストな再生点">波形を見ると判るように、ベストな点がある。音でも聞き分けできる。この時カウンターは信号を拾っているのでラジオは発振状態ではある。</p>
<p class="youtube" title="YouTube: ベストな再生点">オイラが持っている本には、ピー音、ボー音など差分によるビート音が聴こえる状態を帰還発振。支障なく音が聴こえる状態を再生状態と区別したニュアンスで記述がある。</p>
<p class="youtube" title="YouTube: ベストな再生点">カウンターが信号を受けているのは事実であり、数字表示しながら放送が聞こえるよう調整できるのも事実だ。オシロ波形からは多くのことを学べる。</p>
<p class="youtube" title="YouTube: ベストな再生点"><strong>上手に再生できている時は残念ながら発振している</strong>。（動画のように周波数カウンターが反応している)。</p>
<p class="youtube" title="YouTube: ベストな再生点">高一部の同調バリコンを回すと信号が強弱するので、入力に応じて再生されていることも判る。</p>
<p>④もう少し触ってみた。</p>
<p class="youtube" title="YouTube: 6D6再生ラジオで実験"><img src="https://i.ytimg.com/vi/TzTgs1XfoKc/default.jpg?w=425&amp;h=355&amp;player=1" alt="6D6再生ラジオで実験" /> <br /> <a class="title" href="http://jp.youtube.com/watch?v=TzTgs1XfoKc" target="_blank">YouTube: 6D6再生ラジオで実験</a></p>
<p class="youtube" title="YouTube: 6D6再生ラジオで実験">強い発振になってしまうと放送波がなくてもoscする。(当り前ですね)</p>
<p class="youtube" title="YouTube: 6D6再生ラジオで実験"></p>
<p class="youtube" title="YouTube: 6D6再生ラジオで実験"><span style="font-size: x-large;"><strong>まとめ</strong></span></p>
<p class="youtube" title="YouTube: 6D6再生ラジオで実験"></p>
<p class="youtube" title="YouTube: 6D6再生ラジオで実験">軽微な発振状態でラジオ受信できる。これを再生検波状態と呼ぶようだ。</p>
<p class="youtube" title="YouTube: 6D6再生ラジオで実験">強い発振状態では音声には為らない。強い発振になる前に「ベストな検波状態」がある。</p>
<p class="youtube" title="YouTube: 6D6再生ラジオで実験">発振強度はコントロールできる。これは普通の発振回路と同じ。</p>
<p class="youtube" title="YouTube: 6D6再生ラジオで実験">いわゆる「発振の一歩手前」ってのを今回は動画にUPできた。(ただしカウンターは反応しているので<strong>強い発振の手前</strong>と呼ぶのが良いと想う）。言葉だけ一人歩きしたようで、実際には軽微な発振状態が感度よい、取り分け<strong>強い発振の手前</strong>がgood.</p>
<p class="youtube" title="YouTube: 6D6再生ラジオで実験">「如何に軽微な発振をスムーズ化するか？」　これは結構　難しい。並3コイルの出来とバリコンの相性もある。　</p>
<p class="youtube" title="YouTube: 6D6再生ラジオで実験">グリッド抵抗とC値の設計方法はNHK発行の本に記述があるので一読をお勧めする。</p>
<p class="youtube" title="YouTube: 6D6再生ラジオで実験">再生式ラジオの理解が進みましたでしょうか？</p>
<p class="youtube" title="YouTube: 6D6再生ラジオで実験"><a target="_self" href="http://takinx.dcnblog.jp/radio_kit_/2016/06/post-03ef.html">再生時は軽微な発振状態だ</a>　へ続きます。</p>
<p class="youtube" title="YouTube: 6D6再生ラジオで実験">再生検波に相応しい球はバリミュー管だ。古書にも列記がある。特性を考えるとバリミューに帰結する。とりわけややお疲れで増幅度が少し下がった球のほうが、電圧に対するレスポンスがゆるやかなのか？　いたって具合が良い。　再生動作のsg電圧はコイルの巻き数（比率？)に依存するので、様々な製作記は参考情報として眺めるのが良い。</p>
<p><a href="http://auctions.yahoo.co.jp/jp/booth/takinx"><img alt="出品中の商品はこちら" src="http://image.auctions.yahoo.co.jp/button01.gif" /></a></p>
<p><strong>2016年6月17日追記</strong></p>
<p>オイラが部品購入で好んで使っている「マルツ」さんのWEB</p>
<p>「<a target="_self" href="http://www.marutsu.co.jp/wp/datatech/4562/">懐かしのラジオでラジオの基本をおさらい 第１回</a>」記事中の説明文が</p>
<p>「再生式では発振（ピーー音）寸前で再生バリコンを調整し、この時が最大感度です」とあるが実際には<strong>再生時は軽微な発振状態</strong>なので、訂正していただくようお願い申し上げた。　広報性の強い販売商社さんゆえに<strong>正しいことを伝えていただきたい</strong>。</p>
<p>さて、訂正されるか？　そのままか？</p>
<p>自分で手持ちの再生式ラジオに周波数カウンターを当てればすぐに判ることなんだけどね。</p>
<p>どうも、訂正される気配はないようですね。</p></div>
]]>
</content>


    </entry>
    <entry>
        <title>LED 1個を 100Ｖで点灯させる。100vでledを点灯  ⇒ ラジオのパイロットランプの置き換え案：　パイロットランプ LED  AC100V　</title>
        <link rel="alternate" type="text/html" href="http://www.radiokits.jp/radio_kit_/2016/04/led1-100-e7b4.html" />
        <link rel="replies" type="text/html" href="http://www.radiokits.jp/radio_kit_/2016/04/led1-100-e7b4.html" thr:count="2" thr:updated="2016-04-30T19:30:15+09:00" />
        <id>tag:app.dcnblog.jp,2003:post-56968531</id>
        <published>2016-04-30T17:04:00+09:00</published>
        <updated>2022-04-04T13:50:58+09:00</updated>
        <summary>＊＊＊＊＊＊＊＊＊＊＊＊＊＊＊＊＊＊＊＊＊＊＊＊＊＊＊＊＊＊＊＊＊＊＊＊＊＊＊＊...</summary>
        <author>
            <name>takinx</name>
        </author>
        <category scheme="http://www.sixapart.com/ns/types#category" term="1R-STD 単球　再生式ラジオキット" />
        <category scheme="http://www.sixapart.com/ns/types#category" term="1RW-DX    単球　再生式ラジオキット　(6EH8)" />
        <category scheme="http://www.sixapart.com/ns/types#category" term="3S-STD 真空管　3球スーパーラジオキット   " />
        <category scheme="http://www.sixapart.com/ns/types#category" term="6石スーパーラジオ　キット：　チェリー　CK-606" />
        <category scheme="http://www.sixapart.com/ns/types#category" term="Felip  5球ST管　スーパー改造製作" />
        <category scheme="http://www.sixapart.com/ns/types#category" term="LED　1個を 100Ｖで点灯　　　ラジオのパイロットランプの置き換え案" />
        <category scheme="http://www.sixapart.com/ns/types#category" term="TX-1 真空管式 2球AMワイヤレス　マイクキット" />
        <category scheme="http://www.sixapart.com/ns/types#category" term="チェリー　KM-88　8石トランジスタ　AMラジオキット" />
        <category scheme="http://www.sixapart.com/ns/types#category" term="メンテナンス　HR-10B Heath kit" />
        <category scheme="http://www.sixapart.com/ns/types#category" term="メンテナンス　S-106 クライスラー" />
        <category scheme="http://www.sixapart.com/ns/types#category" term="メンテナンス　TRIO AF-10" />
        <category scheme="http://www.sixapart.com/ns/types#category" term="メンテナンス　TRIO AF-20" />
        <category scheme="http://www.sixapart.com/ns/types#category" term="レフレックス +再生　1球 真空管ラジオ (6GH8)" />
        <category scheme="http://www.sixapart.com/ns/types#category" term="真空管ラジオ　MT管IF3段" />
        <category scheme="http://www.sixapart.com/ns/types#category" term="録録　★" />
        
        
<content type="html" xml:base="http://www.radiokits.jp/radio_kit_/">
<![CDATA[
<div xmlns="http://www.w3.org/1999/xhtml"><p><a href="http://takinx.dcnblog.jp/.shared/image.html?/photos/uncategorized/2016/04/30/90fba601871917f6b05b54.jpg" onclick="window.open( this.href, '_blank', 'width=531,height=800,scrollbars=no,resizable=no,toolbar=no,directories=no,location=no,menubar=no,status=no,left=0,top=0' ); return false"></a></p>
<p><a href="http://takinx.dcnblog.jp/.shared/image.html?/photos/uncategorized/2022/02/11/yanagiyurina433.jpg" onclick="window.open( this.href, '_blank', 'width=1200,height=799,scrollbars=no,resizable=no,toolbar=no,directories=no,location=no,menubar=no,status=no,left=0,top=0' ); return false"><img class="asset  asset-image at-xid-photo-58313975" style="width: 300px; display: block;" title="Yanagiyurina433" src="http://takinx.dcnblog.jp/radio_kit_/images/2022/02/11/yanagiyurina433.jpg" alt="Yanagiyurina433" /></a></p>
<p><a href="http://takinx.dcnblog.jp/.shared/image.html?/photos/uncategorized/2022/02/11/yanagiyurina349.jpg" onclick="window.open( this.href, '_blank', 'width=900,height=1200,scrollbars=no,resizable=no,toolbar=no,directories=no,location=no,menubar=no,status=no,left=0,top=0' ); return false"><img class="asset  asset-image at-xid-photo-58313976" style="width: 300px; display: block;" title="Yanagiyurina349" src="http://takinx.dcnblog.jp/radio_kit_/images/2022/02/11/yanagiyurina349.jpg" alt="Yanagiyurina349" /></a></p>
<p>＊＊＊＊＊＊＊＊＊＊＊＊＊＊＊＊＊＊＊＊＊＊＊＊＊＊＊＊＊＊＊＊＊＊＊＊＊＊＊＊＊＊＊＊＊＊</p>
<p>ラジオの2.5Vパイロットランプで　「GT管：真空管ラジオ」の<a href="http://radio.erx.jp/" target="_self">WEB MASTER</a>が苦労されておられるようなので、ささっと実験する。</p>
<p>LEDはlight emitting diodeの略なのはご存知ですね。　日本語では発光ダイオードと呼称されている。<strong>diodeゆえに整流もしてくれるが、通過電流値が小さいので注意、</strong></p>
<p>電流を流し過ぎると瞬時にお亡くなりなるので、　流れる量に注意することが基本。</p>
<p>①メーカー推奨の電流値があるので、正式な型式とランクがわかっていれば、データシートを事前に眺めておく。</p>
<p>LEDは電流値と輝度で分類器にかけて、ランクを自動分類をしている。（オイラは昔、そういう装置の設計屋だった)</p>
<p>で、LEDに掛かる電流を絞る直列抵抗を<strong>電流制限抵抗</strong>と呼ぶ。</p>
<p><a href="http://takinx.dcnblog.jp/.shared/image.html?/photos/uncategorized/2016/04/30/151.jpg" onclick="window.open( this.href, '_blank', 'width=800,height=600,scrollbars=no,resizable=no,toolbar=no,directories=no,location=no,menubar=no,status=no,left=0,top=0' ); return false"><img class="asset  asset-image at-xid-photo-52715339" style="width: 300px; display: block;" title="151" src="http://takinx.dcnblog.jp/radio_kit_/images/2016/04/30/151.jpg" alt="151" /></a></p>
<p>②上の写真のように、AC100vが掛かる配線にして</p>
<p>とりあえず470kΩ、150kΩ、56kΩの2w抵抗とシリーズにそれぞれLEDをつけた。計3系統になる。</p>
<p>オームの法則から、それぞれ流れる電流値が違うことは小学生レベルの計算でわかる。</p>
<p></p>
<p>③さて交流100VをON。</p>
<p><a href="http://takinx.dcnblog.jp/.shared/image.html?/photos/uncategorized/2016/04/30/152.jpg" onclick="window.open( this.href, '_blank', 'width=800,height=600,scrollbars=no,resizable=no,toolbar=no,directories=no,location=no,menubar=no,status=no,left=0,top=0' ); return false"><img class="asset  asset-image at-xid-photo-52715401" style="width: 300px; display: block;" title="152" src="http://takinx.dcnblog.jp/radio_kit_/images/2016/04/30/152.jpg" alt="152" /></a></p>
<p><a href="http://takinx.dcnblog.jp/.shared/image.html?/photos/uncategorized/2016/04/30/153.jpg" onclick="window.open( this.href, '_blank', 'width=800,height=600,scrollbars=no,resizable=no,toolbar=no,directories=no,location=no,menubar=no,status=no,left=0,top=0' ); return false"><img class="asset  asset-image at-xid-photo-52715407" style="width: 300px; display: block;" title="153" src="http://takinx.dcnblog.jp/radio_kit_/images/2016/04/30/153.jpg" alt="153" /></a></p>
<p>56KΩと直列のLEDがもっとも明るい。そりゃ、3系統の中では電流が沢山流れるからね。</p>
<p></p>
<p><span style="font-size: x-large;"><strong>まとめ</strong></span></p>
<p>問題なく点灯する。流したい電流に合わせた抵抗値にすればOK。　抵抗に掛かるワット数はオームの法則から導きだされる「その値」。<strong>LEDはlight emitting diodeなので別途整流デバイスは不要。AC100V印加時は方向性なし。</strong></p>
<p>56KΩだと2mA弱流れる。掛かるワット数はAC100V印加として0.2W弱。</p>
<p>安全率10倍で2W抵抗にする。(JISと中国規格は異なるので、注意）。伊那谷の興亜工業の抵抗であれば設計側で充分なマージンをみているので、最も安心安全です。向山先生、ご無沙汰しております。中国製1W抵抗だとじっくりと焦げて変色していくので3年後も使えるかは不明。</p>
<p>これで口金タイプのLEDに、流したい電流にあった抵抗を吊るせば　よさそうですね。</p>
<p>******************************************************************</p>
<p>安全率の考え方は、業界でことなる。</p>
<p>・河川の護岸工事の耐水圧は概ね1.5倍で設計。</p>
<p>・ボールネジ、LMガイド等は一流メーカーでは安全率10倍。廉価メーカーのは安全率2倍（簡単に壊れる）。</p>
<p>・オイラは機械設計屋なので安全率は少なくとも5倍。できたら10倍で設計する業務。</p>
<p><strong>ヒーター6.3Vに吊るす場合は680オームの1/2W抵抗でOK.</strong></p>
<p>*******************************************************************</p>
<p class="youtube"><img src="https://i.ytimg.com/vi/1MHTBqOlxC8/default.jpg?w=225&amp;h3=55&amp;player=1" alt="ワイヤレスマイク　：6sq7+6j5+6sa7" /> <br /> <a href="http://jp.youtube.com/watch?v=1MHTBqOlxC8" target="_blank" class="title" rel="noopener">YouTube: ワイヤレスマイク　：6sq7+6j5+6sa7</a></p>
<p class="youtube"></p>
<p class="youtube"><img src="https://i.ytimg.com/vi/WQA2qggGmhE/default.jpg?w=225&amp;h3=55&amp;player=1" alt="TA7642ラジオ基板にSメータ。RK-94v2" /> <br /> <a href="http://jp.youtube.com/watch?v=WQA2qggGmhE" target="_blank" class="title" rel="noopener">YouTube: TA7642ラジオ基板にSメータ。RK-94v2</a></p>
<p></p>
<p class="youtube"></p>
<p class="youtube"><img src="https://i.ytimg.com/vi/xY3vYU9f3Rs/default.jpg?w=225&amp;h3=55&amp;player=1" alt="プリント基板でつくるワイヤレスマイク：6SN7+6SA7" /> <br /> <a href="http://jp.youtube.com/watch?v=xY3vYU9f3Rs" target="_blank" class="title" rel="noopener">YouTube: プリント基板でつくるワイヤレスマイク：6SN7+6SA7</a></p>
<p></p>
<p class="youtube"><img src="https://i.ytimg.com/vi/dXeZCQhVxWU/default.jpg?w=225&amp;h3=55&amp;player=1" alt="roger beep:testing" /> <br /> <a href="http://jp.youtube.com/watch?v=dXeZCQhVxWU" target="_blank" class="title" rel="noopener">YouTube: roger beep:testing</a></p>
<p></p>
<p class="youtube"><img src="https://i.ytimg.com/vi/zKLzghMgt_M/default.jpg?w=225&amp;h3=55&amp;player=1" alt="自作真空管ラジオ　：通電確認中" /> <br /> <a href="http://jp.youtube.com/watch?v=zKLzghMgt_M" target="_blank" class="title" rel="noopener">YouTube: 自作真空管ラジオ　：通電確認中</a></p>
<p class="youtube"></p>
<p class="youtube"><img src="https://i.ytimg.com/vi/JAlr3R_KGEk/default.jpg?w=225&amp;h3=55&amp;player=1" alt="自作真空管ラジオ：　IFは6BJ6の 2段。" /> <br /> <a href="http://jp.youtube.com/watch?v=JAlr3R_KGEk" target="_blank" class="title" rel="noopener">YouTube: 自作真空管ラジオ：　IFは6BJ6の 2段。</a></p>
<p></p>
<p></p>
<p></p></div>
]]>
</content>


    </entry>
    <entry>
        <title></title>
        <link rel="alternate" type="text/html" href="http://www.radiokits.jp/radio_kit_/2016/01/post-ec23.html" />
        <link rel="replies" type="text/html" href="http://www.radiokits.jp/radio_kit_/2016/01/post-ec23.html" />
        <id>tag:app.dcnblog.jp,2003:post-56564861</id>
        <published>2016-01-17T12:31:34+09:00</published>
        <updated>2016-01-20T18:39:00+09:00</updated>
        <summary>毎日、年金砲を撃って　2016年1月5日～16日までに7兆円　年金が溶けたらしい...</summary>
        <author>
            <name>takinx</name>
        </author>
        <category scheme="http://www.sixapart.com/ns/types#category" term=" 「だれでもできる電波通信実験」を造ってみた。" />
        <category scheme="http://www.sixapart.com/ns/types#category" term=" 超再生式FMチューナーキット  DBR-402" />
        <category scheme="http://www.sixapart.com/ns/types#category" term="1RW-DX    単球　再生式ラジオキット　(6EH8)" />
        <category scheme="http://www.sixapart.com/ns/types#category" term="6TR-STD  6石　トランジスタラジオキット" />
        <category scheme="http://www.sixapart.com/ns/types#category" term="AMラジオキット　TECSUN社製　2P3" />
        <category scheme="http://www.sixapart.com/ns/types#category" term="KIT-210  AM/FM ラジオ" />
        <category scheme="http://www.sixapart.com/ns/types#category" term="KIT-600  ホームラジオキット AM/SW/FM　3バンド" />
        <category scheme="http://www.sixapart.com/ns/types#category" term="TX-1 真空管式 2球AMワイヤレス　マイクキット" />
        <category scheme="http://www.sixapart.com/ns/types#category" term="アイテック電子研究所 新SR-7  7Mhz レシーバーキット" />
        <category scheme="http://www.sixapart.com/ns/types#category" term="イスペット　6石トランジスタ　AMラジオ　キット CR-P461A" />
        <category scheme="http://www.sixapart.com/ns/types#category" term="カセットプレーヤキット　K-501_" />
        <category scheme="http://www.sixapart.com/ns/types#category" term="チェリー　KM-88　8石トランジスタ　AMラジオキット" />
        <category scheme="http://www.sixapart.com/ns/types#category" term="ハム音のなぞ" />
        <category scheme="http://www.sixapart.com/ns/types#category" term="フォアーランド　FR-7100  FM/AM　ラジオキット" />
        <category scheme="http://www.sixapart.com/ns/types#category" term="ミズホ通信研究所　中波帯ＡＭストレートラジオ" />
        <category scheme="http://www.sixapart.com/ns/types#category" term="メンテナンス　真空管ラジオ　ONKYO OS-195" />
        <category scheme="http://www.sixapart.com/ns/types#category" term="自作　LC発振　4石FMワイヤレスマイク（バリキャップ変調)" />
        <category scheme="http://www.sixapart.com/ns/types#category" term="自作　ラジオ用GT管アンプ　" />
        <category scheme="http://www.sixapart.com/ns/types#category" term="自作　中波帯　ST管式AMワイヤレスマイク 05号機" />
        <category scheme="http://www.sixapart.com/ns/types#category" term="自作　水晶発振式4石FMワイヤレスマイク(バリキャップ変調)" />
        <category scheme="http://www.sixapart.com/ns/types#category" term="自作　電池管3A5　FMワイヤレスマイク " />
        <category scheme="http://www.sixapart.com/ns/types#category" term="録録　★" />
        
        
<content type="html" xml:base="http://www.radiokits.jp/radio_kit_/">
<![CDATA[
<div xmlns="http://www.w3.org/1999/xhtml"><p></p>
<p></p>
<p>毎日、年金砲を撃って　2016年1月5日～16日までに7兆円　年金が溶けたらしい。</p>
<p>溶けたのは30兆円とかの情報もあるが、　平民は溶かす権限もない。　もちろん溶かすことができる立場の人間は責任は取らない。</p>
<p>民間なら責任を責められるが、7兆円溶かしてもOKな商売もあるようだ。</p>
<p></p>
<p>＊＊＊＊＊＊＊＊＊＊＊＊＊＊＊＊＊＊＊＊＊＊＊＊＊＊＊＊＊＊＊＊＊＊＊＊＊</p>
<p><strong><span style="font-size: xx-large;">リフトはRIFT</span></strong></p>
<p><strong><span style="font-size: xx-large;">何のこっちゃ？</span></strong></p>
<p><span style="font-size: large;"><strong>「持ち上げるのは、LIFT」と中学で教わるが、オイラが世話になっている会社ではRIFTと表記する。</strong></span></p>
<p><span style="font-size: large;"><strong>LIFTなどと表記するものなら「馬鹿、アホ」と罵られる。</strong></span></p>
<p></p>
<p><span style="font-size: large;"><strong>加工基準は、BASE HOLEと表記する。originと表記して苛められた奴もいた。　</strong></span></p>
<p><span style="font-size: large;"><strong>高卒程度の教養があると,色々と不都合があるらしい。<br /></strong></span></p>
<p></p>
<p><span style="font-size: large;"><strong>苛められたくはないので、現実にあわせる。　社会通念からズレても気にしちゃいけない。</strong></span></p>
<p><span style="font-size: large;"><strong>RIFT表記のFA装置は10年前の製作だが、某大手の協力工場で今も稼動中だ。（初めてみた時は　腰が抜けた)</strong></span></p>
<p>BASE HOLE図面は納入先でおそらくPDF⇒保存されている。　</p></div>
]]>
</content>


    </entry>
    <entry>
        <title>すこし改善してみました。⇒TX-1　AMワイヤレスマイクキット</title>
        <link rel="alternate" type="text/html" href="http://www.radiokits.jp/radio_kit_/2012/11/post-d297.html" />
        <link rel="replies" type="text/html" href="http://www.radiokits.jp/radio_kit_/2012/11/post-d297.html" thr:count="0" />
        <id>tag:app.dcnblog.jp,2003:post-48102439</id>
        <published>2012-11-24T15:42:45+09:00</published>
        <updated>2014-05-27T20:42:09+09:00</updated>
        <summary>自動車もAT車が圧倒的なシェアになって、 マニュアル車の時代には、考えられなかっ...</summary>
        <author>
            <name>takinx</name>
        </author>
        <category scheme="http://www.sixapart.com/ns/types#category" term="TX-1 真空管式 2球AMワイヤレス　マイクキット" />
        
        
<content type="html" xml:base="http://www.radiokits.jp/radio_kit_/">
<![CDATA[
<div xmlns="http://www.w3.org/1999/xhtml"><p><strong><span style="color: #000000;">自動車もAT車が圧倒的なシェアになって、</span></strong></p>
<p><strong><span style="color: #000000;">マニュアル車の時代には、考えられなかった「アクセルとブレーキを踏み間違える」事故が、毎週のように報道されていますね。</span></strong></p>
<p><strong><span style="color: #000000;">機械化や自動化によって、簡便になったその分だけ、　</span></strong></p>
<p><span style="color: #000000;"><strong>ヒトはお馬鹿になって行くことに何故</strong><strong>気つかないのか？？</strong></span></p>
<p><strong><span style="color: #000000;">①オイラは、機械設計屋なので　センサーメーカーが新商品の宣伝に来たりするんだけど、ちょっと原理的な技術面で質問すると　ほとんどの営業が答えられないんだよね。</span></strong></p>
<p><strong><span style="color: #000000;">「後日、連絡します」ってのが答えなんだ。</span></strong></p>
<p><strong><span style="color: #000000;">ある会社は、ほとんど即答できないね</span><span style="color: #0066ff;">。特許内容を聞いているのではなく、枯れた基礎原理なんだよね。</span></strong></p>
<p><strong><span style="color: #000000;">「商品の動作原理も知らなくて、自社製品売り込む」ことが出来て、</span></strong></p>
<p><strong><span style="color: #000000;">日本国は凄いとオイラは感心してます。</span></strong></p>
<p></p>
<p><strong>②え～と、FA業界のセンサーでも</strong><strong>ギャクがあって、</strong></p>
<p><strong>「Kンス社が売っている2線式近接センサーが、Kンス社製シーケンサーでは使えない」って</strong><strong>矛と盾の状態です。　ええ、オイラ「使えない」ってメーカーの営業</strong><strong>から正式コメント</strong><strong>貰いましたよ。</strong></p>
<p><strong>なんでもシーケンサーの閾値が,他メーカーより高くて19Vだったかな？ </strong></p>
<p><strong>で、ノイズに強い2線式近接センサを接続すると、ON⇔OFFが検出不能なんですって。</strong></p>
<p><strong>「ノイズに弱い3線式近接だとOK」なので、　「ノイズに強い製品2線式が使えない」そうです。</strong></p>
<p><strong>近接センサーの市場では、「ノイズに強い2線式近接」が8割以上を占めているんですがね、、。 </strong></p>
<p><strong>普通にTTLでは「閾値が高い」ことは、信号線に重畳したノイズには不利ですね。</strong></p>
<p><strong>まあ、その見返りに応答性は速いけどね、</strong></p>
<p><strong>「ノイズに弱くして応答性を上げる」ってのが今後の流れでしょう</strong><strong>か、、、。</strong></p>
<p></p>
<p><strong>そんなのが、日本の製造業の現場です。</strong></p>
<p><strong>まあ、オイラは<a href="http://takinx.dcnblog.jp/radio_kit_/cat9407079/">お馬鹿</a>ですね。</strong></p>
<p></p>
<p></p>
<p></p>
<p><strong><span style="color: #0066ff;">＊＊＊＊＊＊＊＊＊＊＊＊＊＊＊＊＊＊＊＊＊＊＊＊＊＊＊＊＊＊＊＊＊</span></strong></p>
<p>この<strong>AMワイヤレスマイクキット　TX-1</strong>を半田つけしたのが、1月でした。</p>
<p>秋口から、<a href="http://takinx.dcnblog.jp/radio_kit_/3fm6ew66gu7/">FMワイヤレスマイク</a>と<a href="http://takinx.dcnblog.jp/radio_kit_/am/">AMワイヤレスマイク</a>の自作をしていたので、</p>
<p>このTX-1もちょっと改善してみました。</p>
<p>以前から「少し変調が浅いなあ、、。」と想っていました。</p>
<p><strong><span style="color: #000000;">オシロで変調具合が判る方むけの情報になります。</span></strong></p>
<p><span style="color: #000000;"><strong>「変調って何？？」[それ何？　教えて！！」</strong><strong>と想われる方は、</strong></span></p>
<p><strong><span style="color: #000000;">記事を読み飛ばしてください。</span></strong></p>
<p></p>
<p><strong><span style="color: #ff0000; font-size: 1.4em;">電池管3A5を9Vで使った</span><a href="http://takinx.dcnblog.jp/radio_kit_/tr_bcam_/"><span style="color: #ff0000; font-size: 1.4em;">AMワイヤレスマイク</span></a><span style="color: #ff0000; font-size: 1.4em;">も動作してます</span><span style="font-size: 1.4em;">。</span></strong></p>
<p><strong><span style="color: #0066ff;">＊＊＊＊＊＊＊＊＊＊＊＊＊＊＊＊＊＊＊＊＊＊＊＊＊＊＊＊＊＊＊＊＊</span></strong></p>
<p><strong><span style="color: #0066ff;"><a href="http://takinx.dcnblog.jp/.shared/image.html?/photos/uncategorized/2013/02/17/061.jpg" onclick="window.open(this.href, '_blank', 'width=800,height=600,scrollbars=no,resizable=no,toolbar=no,directories=no,location=no,menubar=no,status=no,left=0,top=0'); return false"><img src="http://takinx.dcnblog.jp/radio_kit_/images/2013/02/17/061.jpg" alt="061" title="061" border="0" height="225" width="300" /></a> </span></strong></p>
<p><strong><span style="color: #0066ff;">ワイヤレスマイクも、AM,FMこんなに数が増えました。カテゴリーから入ってください。</span></strong></p>
<p><strong><span style="color: #0066ff;">＊＊＊＊＊＊＊＊＊＊＊＊＊＊＊＊＊＊＊＊＊＊＊＊＊＊＊＊＊＊＊＊＊</span></strong></p>
<p></p>
<p></p>
<p></p>
<p></p>
<p></p>
<p>★マイク端子に、50mVほど印加すると程よい変調になることが、事前にわかっています。</p>
<p>（<strong>HEPTODE管をワイヤレスマイクに使用した際の、マイクアンプ部の必須ゲインは</strong></p>
<p><strong>6BA7の<a href="http://takinx.dcnblog.jp/radio_kit_/2012/12/post-8948.html">記事</a>をみてください。)</strong></p>
<p>マイクの起電圧を3mVとすると18倍(25dB)ほどのゲインが必要です。</p>
<p>真空管を1個追加しても30db増は確保できないので、今回は半導体でマイクアンプを検討します。</p>
<p>マイクアンプキットもありますが、スペース的にTX-1に入りませんでした。</p>
<p><a href="http://takinx.dcnblog.jp/.shared/image.html?/photos/uncategorized/2012/11/24/090.jpg" onclick="window.open(this.href, '_blank', 'width=800,height=600,scrollbars=no,resizable=no,toolbar=no,directories=no,location=no,menubar=no,status=no,left=0,top=0'); return false"><img src="http://takinx.dcnblog.jp/radio_kit_/images/2012/11/24/090.jpg" alt="090" title="090" border="0" height="225" width="300" /></a></p>
<p>↑トランジスタ1石を追加することにして、　穴を追加します。</p>
<p>トランジスタの駆動電圧は、スクリーン電圧からドロッパー抵抗で確保します。</p>
<p><a href="http://takinx.dcnblog.jp/.shared/image.html?/photos/uncategorized/2012/11/24/091.jpg" onclick="window.open(this.href, '_blank', 'width=800,height=600,scrollbars=no,resizable=no,toolbar=no,directories=no,location=no,menubar=no,status=no,left=0,top=0'); return false"><img src="http://takinx.dcnblog.jp/radio_kit_/images/2012/11/24/091.jpg" alt="091" title="091" border="0" height="225" width="300" /></a></p>
<p>↑トランジスタに掛かるVcc(真空管なし)を計測。　スクリーン抵抗回路に100KΩをつりさげました。抵抗で分圧するのが、設計上は正しいですが、今回はドロッパーＲです。</p>
<p><a href="http://takinx.dcnblog.jp/.shared/image.html?/photos/uncategorized/2012/11/24/092.jpg" onclick="window.open(this.href, '_blank', 'width=800,height=600,scrollbars=no,resizable=no,toolbar=no,directories=no,location=no,menubar=no,status=no,left=0,top=0'); return false"><img src="http://takinx.dcnblog.jp/radio_kit_/images/2012/11/24/092.jpg" alt="092" title="092" border="0" height="225" width="300" /></a></p>
<p></p>
<p></p>
<p>↑目的とする電圧が取れたので、Ｖｃｃのリップル具合を確認。これは読み取り出来ないレベルなのでok。</p>
<p></p>
<p><a href="http://takinx.dcnblog.jp/.shared/image.html?/photos/uncategorized/2012/11/24/093.jpg" onclick="window.open(this.href, '_blank', 'width=800,height=600,scrollbars=no,resizable=no,toolbar=no,directories=no,location=no,menubar=no,status=no,left=0,top=0'); return false"><img src="http://takinx.dcnblog.jp/radio_kit_/images/2012/11/24/093.jpg" alt="093" title="093" border="0" height="225" width="300" /></a></p>
<p></p>
<p>↑6BE6と6BA6を挿して、実電圧を確認。</p>
<p><a href="http://takinx.dcnblog.jp/.shared/image.html?/photos/uncategorized/2012/11/24/094.jpg" onclick="window.open(this.href, '_blank', 'width=800,height=600,scrollbars=no,resizable=no,toolbar=no,directories=no,location=no,menubar=no,status=no,left=0,top=0'); return false"><img src="http://takinx.dcnblog.jp/radio_kit_/images/2012/11/24/094.jpg" alt="094" title="094" border="0" height="225" width="300" /></a></p>
<p><a href="http://takinx.dcnblog.jp/.shared/image.html?/photos/uncategorized/2012/11/24/095.jpg" onclick="window.open(this.href, '_blank', 'width=800,height=600,scrollbars=no,resizable=no,toolbar=no,directories=no,location=no,menubar=no,status=no,left=0,top=0'); return false"><img src="http://takinx.dcnblog.jp/radio_kit_/images/2012/11/24/095.jpg" alt="095" title="095" border="0" height="225" width="300" /></a></p>
<p>↑6BE6のアンテナ端での波形をオシロで確認。（オイラが後付けしたLCが悪さしている？？)</p>
<p><a href="http://takinx.dcnblog.jp/.shared/image.html?/photos/uncategorized/2012/11/24/096.jpg" onclick="window.open(this.href, '_blank', 'width=800,height=600,scrollbars=no,resizable=no,toolbar=no,directories=no,location=no,menubar=no,status=no,left=0,top=0'); return false"><img src="http://takinx.dcnblog.jp/radio_kit_/images/2012/11/24/096.jpg" alt="096" title="096" border="0" height="225" width="300" /></a></p>
<p></p>
<p>↑MIC 入力用のVRを取り付けて、オシロで確認中。</p>
<p>右側がTX-1へ入れた波形。左側が単球レフレックスで受信した波形。</p>
<p></p>
<p></p>
<p></p>
<p>波形はOK。変調は良好になりました。</p>
<p></p>
<p><a href="http://takinx.dcnblog.jp/.shared/image.html?/photos/uncategorized/2012/11/24/097.jpg" onclick="window.open(this.href, '_blank', 'width=800,height=600,scrollbars=no,resizable=no,toolbar=no,directories=no,location=no,menubar=no,status=no,left=0,top=0'); return false"><img src="http://takinx.dcnblog.jp/radio_kit_/images/2012/11/24/097.jpg" alt="097" title="097" border="0" height="225" width="300" /></a></p>
<p>↑トランジスタアンプのゲインを確認。ちょうど30dBでした。</p>
<p>このTRマイクアンプは3Vアウトで歪みます。</p>
<p></p>
<p>もう少し欲しい方は、</p>
<p>①TR2段にするか？</p>
<p>②6BA6の動作点を換えるか？</p>
<p>オイラとしては、これで充分です。</p>
<p><strong><span style="color: #0066ff;">以上、オシロで変調具合が判る方むけの情報でした。</span></strong></p>
<p><br /><strong><span style="color: #0066ff;"></span></strong></p>
<p></p>
<p><a href="http://takinx.dcnblog.jp/.shared/image.html?/photos/uncategorized/2013/10/26/097.jpg" onclick="window.open( this.href, '_blank', 'width=800,height=600,scrollbars=no,resizable=no,toolbar=no,directories=no,location=no,menubar=no,status=no,left=0,top=0' ); return false"><img class="asset  asset-image at-xid-photo-41826003" style="width: 300px; display: block;" alt="097" title="097" src="http://takinx.dcnblog.jp/radio_kit_/images/2013/10/26/097.jpg" /></a></p>
<p><strong><span style="color: #0066ff;">追加回路↑<br /></span></strong></p>
<p><strong><span style="color: #0066ff;">＊＊＊＊＊＊＊＊＊＊＊＊＊＊＊＊＊＊＊＊＊＊＊＊＊＊＊＊＊＊＊</span></strong></p>
<p><a target="_self" href="http://takinx.dcnblog.jp/radio_kit_/6ac76sa7/"><span style="font-size: large;"><strong>GT管ワイヤレスマイク</strong></span></a></p>
<p><a href="http://takinx.dcnblog.jp/.shared/image.html?/photos/uncategorized/2014/05/27/220.jpg" onclick="window.open( this.href, '_blank', 'width=800,height=600,scrollbars=no,resizable=no,toolbar=no,directories=no,location=no,menubar=no,status=no,left=0,top=0' ); return false"><img class="asset  asset-image at-xid-photo-44057901" style="width: 300px; display: block;" alt="220" title="220" src="http://takinx.dcnblog.jp/radio_kit_/images/2014/05/27/220.jpg" /></a></p>
<p><span style="font-size: medium;"><strong><span style="font-size: large;">真空管式FMワイヤレスマイクも面白いですよ。</span>⇒<a target="_self" href="http://takinx.dcnblog.jp/radio_kit_/3fm6ew66gu7/">記事</a></strong></span></p>
<p><a href="http://takinx.dcnblog.jp/.shared/image.html?/photos/uncategorized/2014/05/21/121.jpg" onclick="window.open( this.href, '_blank', 'width=800,height=600,scrollbars=no,resizable=no,toolbar=no,directories=no,location=no,menubar=no,status=no,left=0,top=0' ); return false"><img class="asset  asset-image at-xid-photo-43996443" style="width: 300px; display: block;" alt="121" title="121" src="http://takinx.dcnblog.jp/radio_kit_/images/2014/05/21/121.jpg" /></a></p>
<p></p>
<p></p>
<p><strong><span style="color: #0066ff;">＊＊＊＊＊＊＊＊＊＊＊＊＊＊＊＊＊＊＊＊＊＊＊＊＊＊＊＊＊＊＊</span></strong></p>
<p><strong><span style="color: #0066ff;"><a href="http://takinx.dcnblog.jp/.shared/image.html?/photos/uncategorized/2013/02/27/132.jpg" onclick="window.open(this.href, '_blank', 'width=800,height=600,scrollbars=no,resizable=no,toolbar=no,directories=no,location=no,menubar=no,status=no,left=0,top=0'); return false"><img src="http://takinx.dcnblog.jp/radio_kit_/images/2013/02/27/132.jpg" alt="132" title="132" border="0" height="225" width="300" /></a> </span></strong></p>
<p><strong>★</strong><strong>電池管3A5を9Vで発振させたワイヤレスマイクの製作記事<span style="color: #0066ff;">⇒<a href="http://takinx.dcnblog.jp/radio_kit_/tr_bcam_/">ここ</a>。（3A5の9v発振事例はあまり例がありませんね)</span></strong></p>
<p></p>
<p><a href="http://takinx.dcnblog.jp/.shared/image.html?/photos/uncategorized/2013/02/27/035.jpg" onclick="window.open(this.href, '_blank', 'width=800,height=600,scrollbars=no,resizable=no,toolbar=no,directories=no,location=no,menubar=no,status=no,left=0,top=0'); return false"><img src="http://takinx.dcnblog.jp/radio_kit_/images/2013/02/27/035.jpg" alt="035" title="035" border="0" height="225" width="300" /></a></p>
<p><strong><span style="color: #000000;">★周波数変換用9ピン管の6BA7を使用したワイヤレスマイクの自作記事⇒<a href="http://takinx.dcnblog.jp/radio_kit_/2012/12/post-8948.html">ここ</a>。</span></strong></p>
<p></p>
<p></p>
<p><a href="http://takinx.dcnblog.jp/.shared/image.html?/photos/uncategorized/2013/02/27/037.jpg" onclick="window.open(this.href, '_blank', 'width=800,height=600,scrollbars=no,resizable=no,toolbar=no,directories=no,location=no,menubar=no,status=no,left=0,top=0'); return false"><img src="http://takinx.dcnblog.jp/radio_kit_/images/2013/02/27/037.jpg" alt="037" title="037" border="0" height="225" width="300" /></a></p>
<p>★ <strong>バリコンでfreqを替えれる2号機↑も製作しました。⇒</strong><a href="http://takinx.dcnblog.jp/radio_kit_/tx1_2am2__1/">ここ</a>。</p>
<p><strong>複合管をつかってマイクアンプ部は60db近いので、変調良好です。</strong></p>
<p>★AMは、発振波形（搬送波)が酷くても、<a href="http://takinx.dcnblog.jp/radio_kit_/2012/11/post-916c.html">だれでもできる電波通信</a>のように送信される音とは無縁です。</p>
<p>*****************************************************:</p>
<p><a href="http://takinx.dcnblog.jp/"><span style="font-size: 1.4em;"><strong>TOP PAGE</strong></span></a></p>
<p></p></div>
]]>
</content>


    </entry>
    <entry>
        <title>TX-1 真空管2球式　AMワイヤレスマイクキット 1号機　その2</title>
        <link rel="alternate" type="text/html" href="http://www.radiokits.jp/radio_kit_/2012/01/tx-1-2am2-29b4.html" />
        <link rel="replies" type="text/html" href="http://www.radiokits.jp/radio_kit_/2012/01/tx-1-2am2-29b4.html" thr:count="0" />
        <id>tag:app.dcnblog.jp,2003:post-44193324</id>
        <published>2012-01-15T18:37:20+09:00</published>
        <updated>2015-12-20T20:33:37+09:00</updated>
        <summary>今日ホームセンターに行って、アンテナ素材を見つけてきました。 外径1.6mmのア...</summary>
        <author>
            <name>takinx</name>
        </author>
        <category scheme="http://www.sixapart.com/ns/types#category" term="TX-1 真空管式 2球AMワイヤレス　マイクキット" />
        
        
<content type="html" xml:base="http://www.radiokits.jp/radio_kit_/">
<![CDATA[
<div xmlns="http://www.w3.org/1999/xhtml"><p>今日ホームセンターに行って、アンテナ素材を見つけてきました。</p>
<p>外径1.6mmのアルミ線にしました。（アルマイトの青に惹かれました)</p>
<p></p>
<p><a onclick="window.open(this.href, '_blank', 'width=800,height=600,scrollbars=no,resizable=no,toolbar=no,directories=no,location=no,menubar=no,status=no,left=0,top=0'); return false" href="http://takinx.dcnblog.jp/.shared/image.html?/photos/uncategorized/2012/01/15/035.jpg"><img title="035" alt="035" src="http://takinx.dcnblog.jp/radio_kit_/images/2012/01/15/035.jpg" border="0" height="225" width="300" /></a></p>
<p>↑クルクル巻いて、酸化膜を剥がして丸端子にカシメます。</p>
<p>加えて半田上げしておきます。</p>
<p>（装置設計屋なので、圧着工具類は必需品です)</p>
<p><a onclick="window.open(this.href, '_blank', 'width=800,height=600,scrollbars=no,resizable=no,toolbar=no,directories=no,location=no,menubar=no,status=no,left=0,top=0'); return false" href="http://takinx.dcnblog.jp/.shared/image.html?/photos/uncategorized/2012/01/15/036.jpg"><img title="036" alt="036" src="http://takinx.dcnblog.jp/radio_kit_/images/2012/01/15/036.jpg" border="0" height="225" width="300" /></a></p>
<p>RCAからAF信号(1.5Khz)を入れて波形比較です。</p>
<p>右が低周波発振器の波形(RCA端)</p>
<p>左が1球レフレックラジオのsp端での波形です。</p>
<p>周波数が予想より上でしたので、100PFをパラに追加半田して</p>
<p>使用周波数は920KHZにしました。(OSCコイル＋200PFです)</p>
<p>「どこまで届くのか？」とKIT-9で確認したら、入力20mVで2mでした。</p>
<p>隣の部屋までは飛びませんでした。（この時は、変調が浅かったですね)</p>
<p>電波法上は、余裕でセーフですが、せめて5mは飛ばしたいですね。</p>
<p>⇒入力を上げて、過変調にならないレベルまであげて6m飛びました。</p>
<p>この時、マイク入力は50mV必要です。</p>
<p>LEDも良い色で点灯しています。</p>
<p>造り易いキットなので、オイラが指導者なら薦めますね。</p>
<p>初めて真空管を触る方にも、薦められますね。</p>
<p></p>
<p><a onclick="window.open(this.href, '_blank', 'width=800,height=600,scrollbars=no,resizable=no,toolbar=no,directories=no,location=no,menubar=no,status=no,left=0,top=0'); return false" href="http://takinx.dcnblog.jp/.shared/image.html?/photos/uncategorized/2012/01/15/037_2.jpg"><img title="037_2" alt="037_2" src="http://takinx.dcnblog.jp/radio_kit_/images/2012/01/15/037_2.jpg" border="0" height="225" width="300" /></a></p>
<p>↑テプラを貼って完成です。</p>
<p><strong>追記　2012/JAN/22</strong></p>
<p>写真のアンテナにコイルを付加して、同調させても見ましたが</p>
<p>効果が薄いです。</p>
<p>コールド側は使いたくないなあ、、、。、、。</p>
<p><strong>追記　2012/JAN/29</strong></p>
<p></p>
<table border="0" cellpadding="0" cellspacing="0">
<tbody>
<tr>
<td class="j">
<p><span style="font-size: 82%;"><strong>π</strong>（<strong>パイ</strong>）マッチもやりましたが、　スミスチャートの使い方を忘れていました。</span></p>
<p><span style="font-size: 82%;">元来マッチングには、コールド側も使う必要があります。</span></p>
<p><span style="font-size: 82%;">この単アンテナは、LCの直列共振でRFを吸い込むようにしただけで区切りにします。</span></p>
<p><span style="font-size: 82%;">（直列共振の有無による飛びの差は、</span><span style="font-size: 82%;">ほとんど出ませんでした。</span></p>
<p><span style="font-size: 82%;">Lの線径が細い故に抵抗値が高く、そこで食われている感じです</span><span style="font-size: 82%;">)</span></p>
<p><span style="font-size: 82%;">「Hi-Lが良いのか？」は、実験で確認してありません。</span></p>
</td>
</tr>
</tbody>
</table>
<p></p>
<p><a onclick="window.open(this.href, '_blank', 'width=800,height=600,scrollbars=no,resizable=no,toolbar=no,directories=no,location=no,menubar=no,status=no,left=0,top=0'); return false" href="http://takinx.dcnblog.jp/.shared/image.html?/photos/uncategorized/2012/02/04/001.jpg"><img title="001" alt="001" src="http://takinx.dcnblog.jp/radio_kit_/images/2012/02/04/001.jpg" border="0" height="225" width="300" /></a></p>
<p>DIP METERはTRIO。</p>
<p><strong>＊＊＊＊＊＊＊＊＊＊＊＊＊＊＊＊＊＊＊＊＊＊＊＊＊＊<strong>＊＊＊<strong>＊＊＊<strong>＊＊＊<strong>＊＊＊</strong></strong></strong></strong></strong></p>
<p></p>
<p><a target="_self" href="http://takinx.dcnblog.jp/radio_kit_/sub2.html"><strong>製作したワイヤレスマイク一覧</strong>　</a></p>
<p><span style="font-size: large; color: #0000ff;"><strong>「マジックアイで増幅」ワイヤレスマイク</strong></span></p>
<p><a href="http://takinx.dcnblog.jp/.shared/image.html?/photos/uncategorized/2015/11/21/057.jpg" onclick="window.open( this.href, '_blank', 'width=800,height=600,scrollbars=no,resizable=no,toolbar=no,directories=no,location=no,menubar=no,status=no,left=0,top=0' ); return false"><img class="asset  asset-image at-xid-photo-51353463" style="width: 300px; display: block;" alt="057" title="057" src="http://takinx.dcnblog.jp/radio_kit_/images/2015/11/21/057.jpg" /></a></p>
<p></p>
<p><strong>①電池管　3A5&nbsp; BC帯ワイヤレスマイク　⇒<a target="_self" href="http://takinx.dcnblog.jp/radio_kit_/tr_bcam_/">記事</a></strong></p>
<p></p>
<p><a href="http://takinx.dcnblog.jp/.shared/image.html?/photos/uncategorized/2014/06/15/132.jpg" data-lekumo-event-onclick="window.open( this.href, '_blank', 'width=800,height=600,scrollbars=no,resizable=no,toolbar=no,directories=no,location=no,menubar=no,status=no,left=0,top=0' ); return false"><img alt="132" title="132" src="http://takinx.dcnblog.jp/radio_kit_/images/2014/06/15/132.jpg" /></a></p>
<p></p>
<p></p>
<p></p>
<p><strong>②ＧＴ管4球　BC帯ワイヤレスマイク　⇒　<a target="_self" href="http://takinx.dcnblog.jp/radio_kit_/6ac76sa7/">記事</a></strong></p>
<p></p>
<p></p>
<p></p>
<p><a href="http://takinx.dcnblog.jp/.shared/image.html?/photos/uncategorized/2014/06/15/102.jpg" data-lekumo-event-onclick="window.open( this.href, '_blank', 'width=800,height=600,scrollbars=no,resizable=no,toolbar=no,directories=no,location=no,menubar=no,status=no,left=0,top=0' ); return false"><img alt="102" title="102" src="http://takinx.dcnblog.jp/radio_kit_/images/2014/06/15/102.jpg" /></a></p>
<p></p>
<p></p>
<p></p>
<p><strong>③5石AM ワイヤレスマイク(トランス変調)&nbsp; ⇒　<a target="_self" href="http://takinx.dcnblog.jp/radio_kit_/am/">記事</a></strong></p>
<p></p>
<p><a href="http://takinx.dcnblog.jp/.shared/image.html?/photos/uncategorized/2014/06/15/0131.jpg" data-lekumo-event-onclick="window.open( this.href, '_blank', 'width=800,height=600,scrollbars=no,resizable=no,toolbar=no,directories=no,location=no,menubar=no,status=no,left=0,top=0' ); return false"><img alt="0131" title="0131" src="http://takinx.dcnblog.jp/radio_kit_/images/2014/06/15/0131.jpg" /></a></p>
<p></p>
<p></p>
<p><a href="http://auctions.yahoo.co.jp/jp/booth/takinx"><img alt="出品中の商品はこちら" src="http://image.auctions.yahoo.co.jp/button01.gif" /></a></p>
<p><span style="font-size: large; color: #8000ff;"><strong>真空管AM ワイヤレスマイク(ＳＴ管、GT管)　出品中</strong></span></p>
<p><a href="http://takinx.dcnblog.jp/"><span style="font-size: 1.4em;"><strong>TOP PAGE</strong></span></a></p></div>
]]>
</content>


    </entry>
    <entry>
        <title>TX-1 真空管2球式　AMワイヤレスマイク　キット 1号機</title>
        <link rel="alternate" type="text/html" href="http://www.radiokits.jp/radio_kit_/2012/01/tx-1-2-ccbf.html" />
        <link rel="replies" type="text/html" href="http://www.radiokits.jp/radio_kit_/2012/01/tx-1-2-ccbf.html" thr:count="0" />
        <id>tag:app.dcnblog.jp,2003:post-44141099</id>
        <published>2012-01-09T21:01:28+09:00</published>
        <updated>2023-09-25T19:17:13+09:00</updated>
        <summary>本稿は、「真空管式　AMワイヤレスマイクキット1号機（2球)」　の製作記事です。...</summary>
        <author>
            <name>takinx</name>
        </author>
        <category scheme="http://www.sixapart.com/ns/types#category" term="TX-1 真空管式 2球AMワイヤレス　マイクキット" />
        
        
<content type="html" xml:base="http://www.radiokits.jp/radio_kit_/">
<![CDATA[
<div xmlns="http://www.w3.org/1999/xhtml"><p>本稿は、「真空管式　AMワイヤレスマイクキット1号機（2球)」　の製作記事です。</p>
<p></p>
<p><a href="http://takinx.dcnblog.jp/.shared/image.html?/photos/uncategorized/2023/09/25/p1010071_2.jpg" onclick="window.open( this.href, '_blank', 'width=1200,height=898,scrollbars=no,resizable=no,toolbar=no,directories=no,location=no,menubar=no,status=no,left=0,top=0' ); return false"><img class="asset  asset-image at-xid-photo-59172786" style="width: 300px; display: block;" title="P1010071_2" src="http://takinx.dcnblog.jp/radio_kit_/images/2023/09/25/p1010071_2.jpg" alt="P1010071_2" /></a></p>
<p><a href="http://takinx.dcnblog.jp/.shared/image.html?/photos/uncategorized/2016/01/28/142.jpg" onclick="window.open( this.href, '_blank', 'width=800,height=600,scrollbars=no,resizable=no,toolbar=no,directories=no,location=no,menubar=no,status=no,left=0,top=0' ); return false"><img class="asset  asset-image at-xid-photo-51916073" style="width: 300px; display: block;" title="142" src="http://takinx.dcnblog.jp/radio_kit_/images/2016/01/28/142.jpg" alt="142" /></a></p>
<p>*******************************************</p>
<p>基板化して製作ハードルを下げた作例。</p>
<p><a href="http://takinx.dcnblog.jp/.shared/image.html?/photos/uncategorized/2023/09/25/rk20809.jpg" onclick="window.open( this.href, '_blank', 'width=1200,height=898,scrollbars=no,resizable=no,toolbar=no,directories=no,location=no,menubar=no,status=no,left=0,top=0' ); return false"><img class="asset  asset-image at-xid-photo-59172795" style="width: 300px; display: block;" title="Rk20809" src="http://takinx.dcnblog.jp/radio_kit_/images/2023/09/25/rk20809.jpg" alt="Rk20809" /></a></p>
<p><a href="http://takinx.dcnblog.jp/.shared/image.html?/photos/uncategorized/2023/09/25/rk20804.jpg" onclick="window.open( this.href, '_blank', 'width=1200,height=898,scrollbars=no,resizable=no,toolbar=no,directories=no,location=no,menubar=no,status=no,left=0,top=0' ); return false"><img class="asset  asset-image at-xid-photo-59172790" style="width: 300px; display: block;" title="Rk20804" src="http://takinx.dcnblog.jp/radio_kit_/images/2023/09/25/rk20804.jpg" alt="Rk20804" /></a></p>
<p>基板RK-208は　扱い中。</p>
<p></p>
<p>***************************************************************</p>
<p><span style="font-size: x-large;"><strong>SＴ管マジックアイを電圧増幅管に採用。⇔<span style="color: #c00000;"><a href="http://takinx.dcnblog.jp/radio_kit_/mike_19/" target="_self"><span style="color: #c00000;">ここ。</span></a></span></strong></span></p>
<p><a href="http://takinx.dcnblog.jp/.shared/image.html?/photos/uncategorized/2016/02/10/059.jpg" onclick="window.open( this.href, '_blank', 'width=800,height=600,scrollbars=no,resizable=no,toolbar=no,directories=no,location=no,menubar=no,status=no,left=0,top=0' ); return false"><img class="asset  asset-image at-xid-photo-52024807" style="width: 300px; display: block;" title="059" src="http://takinx.dcnblog.jp/radio_kit_/images/2016/02/10/059.jpg" alt="059" /></a></p>
<p>GT管の3球式⇔<a href="http://takinx.dcnblog.jp/radio_kit_/mike_20/" target="_self">ここ。</a></p>
<p><a href="http://takinx.dcnblog.jp/.shared/image.html?/photos/uncategorized/2016/02/10/088.jpg" onclick="window.open( this.href, '_blank', 'width=800,height=600,scrollbars=no,resizable=no,toolbar=no,directories=no,location=no,menubar=no,status=no,left=0,top=0' ); return false"><img class="asset  asset-image at-xid-photo-52024815" style="width: 300px; display: block;" title="088" src="http://takinx.dcnblog.jp/radio_kit_/images/2016/02/10/088.jpg" alt="088" /></a></p>
<p>パーツ一式でYAHOOに出品中</p>
<p><img title="207_2" src="http://takinx.dcnblog.jp/radio_kit_/images/2016/02/28/207_2.jpg" alt="207_2" /></p>
<p></p>
<p><span style="color: #3399ff;"><strong>＊＊＊＊＊＊＊＊＊＊＊＊＊＊＊＊＊＊＊＊＊＊＊＊＊＊＊＊＊＊＊＊＊＊＊</strong></span></p>
<p><span style="font-size: 1.4em;"><strong><span style="color: #ff3300;">真空管を使ったFMワイヤレスマイクの製作記事は、</span></strong></span></p>
<p>①FM 1号機&nbsp;（回路図あり)&nbsp; 　<a href="http://takinx.dcnblog.jp/radio_kit_/fm_2/">6EW6+6AQ8&nbsp;&nbsp; </a></p>
<p>②FM 2号機 （回路図あり)&nbsp;&nbsp; <a href="http://takinx.dcnblog.jp/radio_kit_/3fm6ew66gu7/">6EW6+6EW6+6GU7</a></p>
<p>③FM 3号機 &nbsp;（回路図あり) &nbsp; <a href="http://takinx.dcnblog.jp/radio_kit_/2fm_36aq86gu7_/">6BK7+6GU7</a></p>
<p>④電池管&nbsp;（回路図あり)&nbsp;&nbsp; 　<a href="http://takinx.dcnblog.jp/radio_kit_/fm3a5/">3A5</a></p>
<p>⑤電池管＋TR （回路図あり)&nbsp; &nbsp; &nbsp; <a href="http://takinx.dcnblog.jp/radio_kit_/fm3a5tr_/">3A5 ハイブリッド</a></p>
<p>⑥　</p>
<p><a href="http://takinx.dcnblog.jp/.shared/image.html?/photos/uncategorized/2016/02/10/405.jpg" onclick="window.open( this.href, '_blank', 'width=800,height=600,scrollbars=no,resizable=no,toolbar=no,directories=no,location=no,menubar=no,status=no,left=0,top=0' ); return false"><img class="asset  asset-image at-xid-photo-52024839" style="width: 300px; display: block;" title="405" src="http://takinx.dcnblog.jp/radio_kit_/images/2016/02/10/405.jpg" alt="405" /></a></p>
<p>を読まれてください。<a href="http://takinx.dcnblog.jp/radio_kit_/6ac76sa7/" target="_self"></a></p>
<p><span style="color: #3399ff;"><strong>＊＊＊＊＊＊＊＊＊＊＊＊＊＊＊＊＊＊＊＊＊＊＊＊＊＊＊＊＊＊＊＊＊＊＊</strong></span></p>
<p><span style="font-size: 1.4em; color: #ff3300;"><strong>他のAMワイヤレスマイクは、</strong></span></p>
<p>①5極管で発振させた（回路図あり)　&nbsp; &nbsp;&nbsp; 　　　　　　　<a href="http://takinx.dcnblog.jp/radio_kit_/bc26n2p6ch8__/"> 2球真空管ワイヤレスマイク(6N2P+6CH8)</a></p>
<p>②<strong>GT管</strong>をつかった　&nbsp; &nbsp;&nbsp; &nbsp;&nbsp; 　　　&nbsp; &nbsp;　　　　<a href="http://takinx.dcnblog.jp/radio_kit_/gtam/">6SA7 真空管ワイヤレスマイク</a></p>
<p>③発振球に6BA7を使った　（回路図あり)　　　　　　　 <a href="http://takinx.dcnblog.jp/radio_kit_/tr_am_6ba7_/">真空管+TR ハイブリッド AMワイヤレスマイク (6BA7) </a></p>
<p>④<strong>秋月のキット(IC+TR)</strong>　　　　　　　　　　<a href="http://takinx.dcnblog.jp/radio_kit_/cat9407079/">だれでもできる電波通信実験</a></p>
<p>⑤9Vで動く真空管3A5　　（回路図あり)　　　<a href="http://takinx.dcnblog.jp/radio_kit_/tr_bcam_/">真空管+TR ハイブリッド　(3A5)</a></p>
<p>⑥<strong>トランジスタを5石</strong>使った　　　（回路図あり)　　　　<a href="http://takinx.dcnblog.jp/radio_kit_/am/">5石式トランス変調</a></p>
<p>⑦感電しない12V専用真空管をつかった　（回路図あり) 　　　<a href="http://takinx.dcnblog.jp/radio_kit_/wireless_microphone/">真空管12DW8　トランス変調</a></p>
<p>⑧メタル管を4球使った　（回路図あり)　　　<a href="http://takinx.dcnblog.jp/radio_kit_/6ac76sa7/" target="_self">メタル管のワイヤレスマイク</a></p>
<p><span style="font-size: 1.2em;">⑨</span>12BE6を12Vで使った　（回路図あり)　　　　<a href="http://takinx.dcnblog.jp/radio_kit_/dc12v_3am/">12V3球式ワイヤレスマイク</a></p>
<p></p>
<p>&nbsp;</p>
<p><a href="http://takinx.dcnblog.jp/.shared/image.html?/photos/uncategorized/2015/12/03/002.jpg" onclick="window.open( this.href, '_blank', 'width=800,height=600,scrollbars=no,resizable=no,toolbar=no,directories=no,location=no,menubar=no,status=no,left=0,top=0' ); return false"><img class="asset  asset-image at-xid-photo-51463985" style="width: 300px; display: block;" title="002" src="http://takinx.dcnblog.jp/radio_kit_/images/2015/12/03/002.jpg" alt="002" /></a></p>
<p><strong>＊＊＊＊＊＊＊＊＊＊＊＊＊＊＊＊＊＊＊＊＊＊＊＊＊＊＊＊＊＊＊＊＊＊＊＊＊＊</strong></p>
<p>ラジオ少年の真空管式　AMワイヤレスマイクキット　TX-1を造り始めました。</p>
<p>OSCコイルの調整で、BC帯の800Khz～1200Khzまでカバーします。</p>
<p>もちろんAM(<strong>A</strong><span style="font-size: 0.8em;"><strong>mplitude Modulation</strong>)</span>です。</p>
<p>ワイヤレスマイクは、中学生のときにTRでFM用を10個位つくりました。</p>
<p>テキストは、「初歩のラジオ」でした。SPをマイクにして遊んでました。</p>
<p>田舎だったので88コイルが調達できずに、FMオンリーでした。</p>
<p>（電子ブロックで、色々と遊んだのを思い出しました)</p>
<p>BC帯の球式ワイヤレスマイクは、初めてになります。</p>
<p>久々にわくわくしますね。&nbsp;</p>
<p><a href="http://takinx.dcnblog.jp/.shared/image.html?/photos/uncategorized/2012/01/09/020.jpg" onclick="window.open(this.href, '_blank', 'width=800,height=600,scrollbars=no,resizable=no,toolbar=no,directories=no,location=no,menubar=no,status=no,left=0,top=0'); return false"><img title="020" src="http://takinx.dcnblog.jp/radio_kit_/images/2012/01/09/020.jpg" alt="020" width="300" height="225" border="0" /></a></p>
<p>パーツ構成↑　見本写真と実体配線図も付属しています。</p>
<p>球は6BA6と6BE6。</p>
<p></p>
<p><a href="http://takinx.dcnblog.jp/.shared/image.html?/photos/uncategorized/2012/01/09/021.jpg" onclick="window.open(this.href, '_blank', 'width=800,height=600,scrollbars=no,resizable=no,toolbar=no,directories=no,location=no,menubar=no,status=no,left=0,top=0'); return false"><img title="021" src="http://takinx.dcnblog.jp/radio_kit_/images/2012/01/09/021.jpg" alt="021" width="300" height="225" border="0" /></a></p>
<p>↑<a href="http://ja.wikipedia.org/wiki/ã¿ã¬ãããã³ããã¬ã¹">タレットパンチャー</a>の数値入力忘れのようで、</p>
<p>ラグ板用穴が不足しているので、追加します。</p>
<p><a href="http://takinx.dcnblog.jp/.shared/image.html?/photos/uncategorized/2012/01/09/022.jpg" onclick="window.open(this.href, '_blank', 'width=800,height=600,scrollbars=no,resizable=no,toolbar=no,directories=no,location=no,menubar=no,status=no,left=0,top=0'); return false"><img title="022" src="http://takinx.dcnblog.jp/radio_kit_/images/2012/01/09/022.jpg" alt="022" width="300" height="225" border="0" /></a></p>
<p>↑アース母線の引き回し中。</p>
<p><a href="http://takinx.dcnblog.jp/.shared/image.html?/photos/uncategorized/2012/01/09/024.jpg" onclick="window.open(this.href, '_blank', 'width=800,height=600,scrollbars=no,resizable=no,toolbar=no,directories=no,location=no,menubar=no,status=no,left=0,top=0'); return false"><img title="024" src="http://takinx.dcnblog.jp/radio_kit_/images/2012/01/09/024.jpg" alt="024" width="300" height="225" border="0" /></a></p>
<p>↑LED系の配線が残ってます。</p>
<p>付属の0.1μFはやや大きいので、手持ちのセラミック104を半田付け。</p>
<p>フィルムコンも1つは　手持ちの小型の103を半田付け。</p>
<p></p>
<p><a href="http://takinx.dcnblog.jp/.shared/image.html?/photos/uncategorized/2012/01/09/023.jpg" onclick="window.open(this.href, '_blank', 'width=800,height=600,scrollbars=no,resizable=no,toolbar=no,directories=no,location=no,menubar=no,status=no,left=0,top=0'); return false"><img title="023" src="http://takinx.dcnblog.jp/radio_kit_/images/2012/01/09/023.jpg" alt="023" width="300" height="225" border="0" /></a></p>
<p>LEDは、ボンドで固定。</p>
<p>付属回路図では、「ヒーターの6.3V⇒1KΩ⇒LED」ですが</p>
<p>「ヒーターの6.3V⇒整流ダイオード⇒1KΩ⇒LED」にしました。</p>
<p>Diは手持ちの1N4007。</p>
<p></p>
<p><a href="http://takinx.dcnblog.jp/.shared/image.html?/photos/uncategorized/2012/01/09/030.jpg" onclick="window.open(this.href, '_blank', 'width=800,height=600,scrollbars=no,resizable=no,toolbar=no,directories=no,location=no,menubar=no,status=no,left=0,top=0'); return false"><img title="030" src="http://takinx.dcnblog.jp/radio_kit_/images/2012/01/09/030.jpg" alt="030" width="300" height="225" border="0" /></a></p>
<p>全部品を付けて終了。↑</p>
<p></p>
<p><a href="http://takinx.dcnblog.jp/.shared/image.html?/photos/uncategorized/2012/01/09/031.jpg" onclick="window.open(this.href, '_blank', 'width=800,height=600,scrollbars=no,resizable=no,toolbar=no,directories=no,location=no,menubar=no,status=no,left=0,top=0'); return false"><img title="031" src="http://takinx.dcnblog.jp/radio_kit_/images/2012/01/09/031.jpg" alt="031" width="300" height="225" border="0" /></a></p>
<p>↑付属の陸軍端子は赤色ですが、手持ちの黄色をつけてみました。</p>
<p>(好みにあわせてください）</p>
<p>VRのツマミを紛失したようなので、手持ちをとりつけました。</p>
<p>回路図では、20KΩを2個使うようになっているのですが、</p>
<p>1個しか見当らなかったので手持ちを使いました。</p>
<p><strong>出力を出しすぎると電波法上NGなので、</strong></p>
<p><strong>遵法できる時定数になっています。</strong></p>
<p>残りは、アンテナ製作です。（エナメル線をこれから調達します)</p>
<p>今日はここまで、、。 <a href="http://takinx.dcnblog.jp/radio_kit_/2012/01/tx-1-2am2-29b4.html">通電はのちほど</a>、、。</p>
<p><strong>＊＊＊＊＊＊＊＊＊＊＊＊＊＊＊＊＊＊＊＊＊＊＊＊＊＊</strong></p>
<p><strong>2012/July/30追記</strong></p>
<p><strong>真空管のFMワイヤレスマイクも<a href="http://takinx.dcnblog.jp/radio_kit_/2012/07/fm-100f.html">製作始めました</a>。</strong></p>
<p></p>
<p><strong><strong><span style="color: #0066ff;">＊＊＊＊＊＊＊＊＊＊＊＊＊＊＊＊＊＊＊＊＊＊＊＊＊＊</span></strong></strong></p>
<p><strong>&nbsp;</strong></p>
<p><strong><strong><span style="color: #0066ff;">2012/Sep/9追記</span></strong></strong></p>
<p><strong>&nbsp;</strong></p>
<p><strong><span style="color: #0066ff;">電池管3A5のFMワイヤレス　<a href="http://takinx.dcnblog.jp/radio_kit_/fm3a5/">造りました</a>。</span></strong></p>
<p><strong>&nbsp;</strong></p>
<p><strong><a href="http://takinx.dcnblog.jp/"><span style="font-size: 1.4em;"><strong>TOP PAGE</strong></span></a></strong></p>
<p><strong>&nbsp;</strong></p>
<p></p>
<p></p>
<p></p>
<p></p>
<p></p>
<p></p></div>
]]>
</content>


    </entry>
 
</feed>
