<?xml version="1.0" encoding="utf-8"?>
<feed xmlns="http://www.w3.org/2005/Atom" xmlns:dc="http://purl.org/dc/elements/1.1/" xmlns:thr="http://purl.org/syndication/thread/1.0">
    <title>RADIO KITS IN JA　: 1Ｒ5(電池管)はいぶりっどトランスミッター</title>
    <link rel="self" type="application/atom+xml" href="http://www.radiokits.jp/radio_kit_/mic_45/atom.xml" />
    <link rel="alternate" type="text/html" href="http://www.radiokits.jp/radio_kit_/" />
    
    <id>tag:app.dcnblog.jp,2003:weblog-358158</id>
    <updated>2018-07-06T23:18:41+09:00</updated>
    <subtitle>信州安曇野発アナログラジオ工作中心blogです。ラジオ自作派にお手伝い用基板１、基板2、基板3、基板4を領布中
  6Z-DH3Aのヒーターピンは必ず1番を接地。間抜けは6番ピンを接地する。　　6Z-DH3Aのピン接続情報 　amazon等での転売shopが多数ありますが、私とは無関係です。騙されぬようにご注意ください。トランジスタラジオキット,真空管短波ラジオ、真空管レフレックスラジオ、AMワイヤレスマイク、FMワイヤレスマイク、12AU7ダイレクトコンバージョン製作。LC7265ラジオ周波数表示器、ミニワッター、トランジスタアンプ、スピーカーの鳴る単球ラジオなど計 605例。 真空管ラジオ修理記やFMチューナー修理記など。20代は半導体ラジオ修理技術者でした。FA機械設計屋を35年やってます。画像多数にてPC推奨します。 資料画像等はお持ち帰りいただいてOKです。記事にする折には、ご一報ください。
since 2011/Aug</subtitle>
    <entry>
        <title>ノイズが判らない3端子レギュレータに換装した。</title>
        <link rel="alternate" type="text/html" href="http://www.radiokits.jp/radio_kit_/2018/07/post-1.html" />
        <link rel="replies" type="text/html" href="http://www.radiokits.jp/radio_kit_/2018/07/post-1.html" thr:count="0" />
        <id>tag:app.dcnblog.jp,2003:post-58538787</id>
        <published>2018-07-06T23:18:41+09:00</published>
        <updated>2025-12-30T15:30:21+09:00</updated>
        <summary>*********** 過去使用経験から、3端子レギュレータは「ノイズが出るメー...</summary>
        <author>
            <name>takinx</name>
        </author>
        <category scheme="http://www.sixapart.com/ns/types#category" term="1Ｒ5(電池管)はいぶりっどトランスミッター" />
        
        
<content type="html" xml:base="http://www.radiokits.jp/radio_kit_/">
<![CDATA[
<div xmlns="http://www.w3.org/1999/xhtml"><p></p>
<p><a href="http://takinx.dcnblog.jp/.shared/image.html?/photos/uncategorized/2018/07/07/hgdmarvawqdqu5.jpg" onclick="window.open( this.href, '_blank', 'width=320,height=240,scrollbars=no,resizable=no,toolbar=no,directories=no,location=no,menubar=no,status=no,left=0,top=0' ); return false"><img class="asset  asset-image at-xid-photo-55881776" style="width: 300px; display: block;" title="Hgdmarvawqdqu5" src="http://takinx.dcnblog.jp/radio_kit_/images/2018/07/07/hgdmarvawqdqu5.jpg" alt="Hgdmarvawqdqu5" /></a></p>
<p>***********</p>
<p><a href="http://takinx.dcnblog.jp/radio_kit_/3.html">過去使用経験</a>から、3端子レギュレータは「ノイズが出るメーカー」と「出ないメーカー」に大別されると想う。正確には「ノイズが出ていても判らない製品」と呼ぶとは想う。　</p>
<p>「3端子レギュレータはノイズが出ない」との文字で印刷物が刊行されているが、「実測数が不足している」或いは　デスクワーク派の可能性もある。　まあ、実測するとノイズ観測できるものが多い。 ノイズが出てラジオ受信に支障のある製品を誉めることは困難だ。</p>
<p></p>
<p>先ず測る。そして思考する。オイラのようなおっさんにはこの方法が似合っている。</p>
<p></p>
<p>AF用デバイスだが　<a href="http://takinx.dcnblog.jp/radio_kit_/2018/07/post-2.html">電波ノイズをしっかりと飛ばすIC</a>もある。</p>
<p></p>
<p>***********************</p>
<p></p>
<p>今年2月にまとめた　<a href="http://takinx.dcnblog.jp/radio_kit_/mic_45/">電池管1R5　トランスミッター</a>（基板ナンバー　RK-11)において、ヒーター1.4Vを生成している3端子レギュレータがノイジーなので、メーカーを変えた。</p>
<p></p>
<p></p>
<p>LM338を使っていたが無音声時のホワイトノイズが常々気になった。　メーカーを換えてもnoisyならばTRAPを数段重ねて、ノイズを交わしたい。</p>
<p><a href="http://takinx.dcnblog.jp/.shared/image.html?/photos/uncategorized/2018/07/06/015.jpg" onclick="window.open( this.href, '_blank', 'width=800,height=600,scrollbars=no,resizable=no,toolbar=no,directories=no,location=no,menubar=no,status=no,left=0,top=0' ); return false"><img class="asset  asset-image at-xid-photo-55881197" style="width: 300px; display: block;" title="015" src="http://takinx.dcnblog.jp/radio_kit_/images/2018/07/06/015.jpg" alt="015" /></a></p>
<p>低ノイズ（ノイズが判らないこと)での実績多数なSTマイクロ製にした。型式は317T。</p>
<p><a href="http://takinx.dcnblog.jp/.shared/image.html?/photos/uncategorized/2018/07/06/016.jpg" onclick="window.open( this.href, '_blank', 'width=800,height=600,scrollbars=no,resizable=no,toolbar=no,directories=no,location=no,menubar=no,status=no,left=0,top=0' ); return false"><img class="asset  asset-image at-xid-photo-55881198" style="width: 300px; display: block;" title="016" src="http://takinx.dcnblog.jp/radio_kit_/images/2018/07/06/016.jpg" alt="016" /><br /></a></p>
<p><a href="http://takinx.dcnblog.jp/.shared/image.html?/photos/uncategorized/2018/07/06/016.jpg" onclick="window.open( this.href, '_blank', 'width=800,height=600,scrollbars=no,resizable=no,toolbar=no,directories=no,location=no,menubar=no,status=no,left=0,top=0' ); return false">&nbsp;</a></p>
<p><a href="http://takinx.dcnblog.jp/.shared/image.html?/photos/uncategorized/2018/07/06/016.jpg" onclick="window.open( this.href, '_blank', 'width=800,height=600,scrollbars=no,resizable=no,toolbar=no,directories=no,location=no,menubar=no,status=no,left=0,top=0' ); return false"></a></p>
<p><a href="http://takinx.dcnblog.jp/.shared/image.html?/photos/uncategorized/2018/07/06/017.jpg" onclick="window.open( this.href, '_blank', 'width=800,height=600,scrollbars=no,resizable=no,toolbar=no,directories=no,location=no,menubar=no,status=no,left=0,top=0' ); return false"><img class="asset  asset-image at-xid-photo-55881199" style="width: 300px; display: block;" title="017" src="http://takinx.dcnblog.jp/radio_kit_/images/2018/07/06/017.jpg" alt="017" /></a></p>
<p></p>
<p><a href="http://takinx.dcnblog.jp/.shared/image.html?/photos/uncategorized/2018/07/06/018.jpg" onclick="window.open( this.href, '_blank', 'width=800,height=600,scrollbars=no,resizable=no,toolbar=no,directories=no,location=no,menubar=no,status=no,left=0,top=0' ); return false"><img class="asset  asset-image at-xid-photo-55881201" style="width: 300px; display: block;" title="018" src="http://takinx.dcnblog.jp/radio_kit_/images/2018/07/06/018.jpg" alt="018" /></a></p>
<p>◇◇</p>
<p>右が1R5トランスミッターに入れた信号。</p>
<p>左がST管ラジオから出てくる信号。</p>
<p><a href="http://takinx.dcnblog.jp/.shared/image.html?/photos/uncategorized/2018/07/06/019.jpg" onclick="window.open( this.href, '_blank', 'width=800,height=600,scrollbars=no,resizable=no,toolbar=no,directories=no,location=no,menubar=no,status=no,left=0,top=0' ); return false"><img class="asset  asset-image at-xid-photo-55881202" style="width: 300px; display: block;" title="019" src="http://takinx.dcnblog.jp/radio_kit_/images/2018/07/06/019.jpg" alt="019" /></a></p>
<p>◇◇</p>
<p>低周波信号発生器を電源OFFしてみた。　聴覚上ホワイトノイズは判らない。　細かい波形はキャリアによるもののようだ。</p>
<p><a href="http://takinx.dcnblog.jp/.shared/image.html?/photos/uncategorized/2018/07/06/020.jpg" onclick="window.open( this.href, '_blank', 'width=800,height=600,scrollbars=no,resizable=no,toolbar=no,directories=no,location=no,menubar=no,status=no,left=0,top=0' ); return false"><img class="asset  asset-image at-xid-photo-55881203" style="width: 300px; display: block;" title="020" src="http://takinx.dcnblog.jp/radio_kit_/images/2018/07/06/020.jpg" alt="020" /></a></p>
<p>◇</p>
<p>1R5トランスミッターの電源OFFしてみた。</p>
<p><a href="http://takinx.dcnblog.jp/.shared/image.html?/photos/uncategorized/2018/07/06/021.jpg" onclick="window.open( this.href, '_blank', 'width=800,height=600,scrollbars=no,resizable=no,toolbar=no,directories=no,location=no,menubar=no,status=no,left=0,top=0' ); return false"><img class="asset  asset-image at-xid-photo-55881204" style="width: 300px; display: block;" title="021" src="http://takinx.dcnblog.jp/radio_kit_/images/2018/07/06/021.jpg" alt="021" /></a></p>
<p></p>
<p>、、とSTマイクロの製品は今回も良好だ。可変電圧タイプでは317Tを推奨する。</p>
<p>推奨メーカーのひとつである。</p>
<p>********************************</p>
<p>1R5のワイヤレスマイクには</p>
<p>RK-343 :2球＋OP AMP</p>
<p class="youtube"><img src="https://i.ytimg.com/vi/HWSsLYnBho4/default.jpg?w=425&amp;h=355&amp;player=1" alt="1T4 + 1R5   ワイヤレスマイク" /> <br /> <a href="http://jp.youtube.com/watch?v=HWSsLYnBho4" target="_blank" class="title" rel="noopener">YouTube: 1T4 + 1R5 ワイヤレスマイク</a></p>
<p></p>
<p><a href="http://www.radiokits.jp/.shared/image.html?/photos/uncategorized/2025/12/30/p1010017.jpg" onclick="window.open( this.href, '_blank', 'width=1200,height=898,scrollbars=no,resizable=no,toolbar=no,directories=no,location=no,menubar=no,status=no,left=0,top=0' ); return false"><img class="asset  asset-image at-xid-photo-60091820" style="width: 300px; display: block;" title="P1010017" src="http://www.radiokits.jp/radio_kit_/images/2025/12/30/p1010017.jpg" alt="P1010017" /></a></p>
<p></p>
<div class="Article__content">&nbsp;</div>
<p>RK-341</p>
<p class="youtube"><img src="https://i.ytimg.com/vi/ihGHsTm26Xk/default.jpg?w=425&amp;h=355&amp;player=1" alt="電池管1R5使用ワイヤレスマイク基板の製作。RK-343" /> <br /> <a href="http://jp.youtube.com/watch?v=ihGHsTm26Xk" target="_blank" class="title" rel="noopener">YouTube: 電池管1R5使用ワイヤレスマイク基板の製作。RK-341</a></p>
<p></p>
<p><a href="http://www.radiokits.jp/.shared/image.html?/photos/uncategorized/2025/12/30/p1010013.jpg" onclick="window.open( this.href, '_blank', 'width=1200,height=898,scrollbars=no,resizable=no,toolbar=no,directories=no,location=no,menubar=no,status=no,left=0,top=0' ); return false"><img class="asset  asset-image at-xid-photo-60091819" style="width: 300px; display: block;" title="P1010013" src="http://www.radiokits.jp/radio_kit_/images/2025/12/30/p1010013.jpg" alt="P1010013" /></a></p></div>
]]>
</content>


    </entry>
    <entry>
        <title>はいぶりっどトランスミッター製作。　電池管1R5を12Vで発振させる。その2</title>
        <link rel="alternate" type="text/html" href="http://www.radiokits.jp/radio_kit_/2018/02/1r52-4ed1.html" />
        <link rel="replies" type="text/html" href="http://www.radiokits.jp/radio_kit_/2018/02/1r52-4ed1.html" thr:count="0" />
        <id>tag:app.dcnblog.jp,2003:post-58372523</id>
        <published>2018-02-12T10:50:46+09:00</published>
        <updated>2018-08-25T09:24:49+09:00</updated>
        <summary>******************************* 昨日の続になる。...</summary>
        <author>
            <name>takinx</name>
        </author>
        <category scheme="http://www.sixapart.com/ns/types#category" term="1Ｒ5(電池管)はいぶりっどトランスミッター" />
        
        
<content type="html" xml:base="http://www.radiokits.jp/radio_kit_/">
<![CDATA[
<div xmlns="http://www.w3.org/1999/xhtml"><p><a href="http://takinx.dcnblog.jp/.shared/image.html?/photos/uncategorized/2018/02/12/15159617290027.jpg" onclick="window.open( this.href, '_blank', 'width=533,height=800,scrollbars=no,resizable=no,toolbar=no,directories=no,location=no,menubar=no,status=no,left=0,top=0' ); return false"><img class="asset  asset-image at-xid-photo-55551535" style="width: 300px; display: block;" title="15159617290027" src="http://takinx.dcnblog.jp/radio_kit_/images/2018/02/12/15159617290027.jpg" alt="15159617290027" /></a></p>
<p></p>
<p>*******************************</p>
<p>昨日の続になる。　「基板ナンバーRK-11」の続だ。</p>
<p>MIC-AMP部も実装した。　FINALは至って軽い動作。</p>
<p></p>
<p><a href="http://takinx.dcnblog.jp/.shared/image.html?/photos/uncategorized/2018/02/12/030.jpg" onclick="window.open( this.href, '_blank', 'width=800,height=600,scrollbars=no,resizable=no,toolbar=no,directories=no,location=no,menubar=no,status=no,left=0,top=0' ); return false"><img class="asset  asset-image at-xid-photo-55550404" style="width: 300px; display: block;" title="030" src="http://takinx.dcnblog.jp/radio_kit_/images/2018/02/12/030.jpg" alt="030" /></a></p>
<p>◇このアンテナで1mほど飛ぶ。　finalはもっと動作の強いほうが良いかも知れない。12v印加での作動中。</p>
<p>3端子レギュレータLM338からのノイズはやや発見しにくい。　ACラインそのものノイズが安定化電源から抜けてくる。サーミスターのノイズやらPC系のノイズが溢れる環境ではある。　LM338からのノイズはLM338出力側で0.1mV程度観測される。所謂ホワイトノイズと同じく広域で10Hz～1MHzまでは観測される。それ以上はVTVMが追い付かない。</p>
<p><a href="http://takinx.dcnblog.jp/.shared/image.html?/photos/uncategorized/2018/02/12/031.jpg" onclick="window.open( this.href, '_blank', 'width=800,height=600,scrollbars=no,resizable=no,toolbar=no,directories=no,location=no,menubar=no,status=no,left=0,top=0' ); return false"><img class="asset  asset-image at-xid-photo-55550403" style="width: 300px; display: block;" title="031" src="http://takinx.dcnblog.jp/radio_kit_/images/2018/02/12/031.jpg" alt="031" /></a></p>
<p></p>
<p>完成品のイメージ。はいぶりっどトランスミッター製作プロジェクトの第2弾がまとまった。</p>
<p>◇OSCコイルは<a href="https://www.kura-denshi.com/" target="_blank" rel="noopener">KURA本店</a>で売っている190円ものをそのままで使える。　千石電商のSITE品は「巻線比が103:11」と真空管のOSC用にぴったりな比である。KURAと千石電商のはOKだが、他shopのは不明だ。</p>
<p>◇球は1R5でも1A2でも入手性の良いものを使えば良い。　NPOラジオ少年では中古の1R5を青箱品としていたって廉価で領布中だ。　</p>
<p>◇mt7ソケットは,ali expressかebay または　<a href="http://www.mableaudio.com/en/products.asp?sid=34">ここ</a>。</p>
<p><a href="http://takinx.dcnblog.jp/.shared/image.html?/photos/uncategorized/2018/02/12/032_2.jpg" onclick="window.open( this.href, '_blank', 'width=800,height=600,scrollbars=no,resizable=no,toolbar=no,directories=no,location=no,menubar=no,status=no,left=0,top=0' ); return false"><img class="asset  asset-image at-xid-photo-55550424" style="width: 300px; display: block;" title="032_2" src="http://takinx.dcnblog.jp/radio_kit_/images/2018/02/12/032_2.jpg" alt="032_2" /></a></p>
<p>作動具合の参考に動画を挙げた。電源電圧は発振させるだけなら8.5V。よい感じの音にするなら13V。試しに17V掛けたがLM338は熱くもならずOK.ただしLM338はノイジーなので　STマイクロのLM317Tを推奨する。</p>
<p></p>
<p class="youtube"><img src="https://i.ytimg.com/vi/CKNPAjxSXws/default.jpg?w=425&amp;h=355&amp;player=1" alt="電池管1A2実験  その2" /> <br /> <a href="http://jp.youtube.com/watch?v=CKNPAjxSXws" target="_blank" class="title" rel="noopener">YouTube: 電池管1A2実験 その2</a></p>
<p></p>
<p>通算239作目になる。</p>
<p>1R5を12Vで使った例は多くない。　ラジオ少年さんの電池管ラジオのOSCはタップドコイル使用。オイラのは88コイル同様に1次・2次の使用。</p>
<p><a href="http://takinx.dcnblog.jp/.shared/image.html?/photos/uncategorized/2018/02/13/036.jpg" onclick="window.open( this.href, '_blank', 'width=800,height=451,scrollbars=no,resizable=no,toolbar=no,directories=no,location=no,menubar=no,status=no,left=0,top=0' ); return false"><img class="asset  asset-image at-xid-photo-55553595" style="width: 300px; display: block;" title="036" src="http://takinx.dcnblog.jp/radio_kit_/images/2018/02/13/036.jpg" alt="036" /></a></p>
<p>◇本基板は、基板ナンバー RK-11になる。　電池管はラジオ少年で購入できる。7ピンソケットは生産国である中国から調達したほうが廉価だ。　国内価格の1/2程度で揃うだろう。LM338/LM317Tはかなり流通している。OSCコイルは上記のようにKURAさんで手に入る。</p>
<p>領布中</p>
<p><a href="http://takinx.dcnblog.jp/.shared/image.html?/photos/uncategorized/2018/02/12/033.jpg" onclick="window.open( this.href, '_blank', 'width=800,height=600,scrollbars=no,resizable=no,toolbar=no,directories=no,location=no,menubar=no,status=no,left=0,top=0' ); return false"><img class="asset  asset-image at-xid-photo-55550436" style="width: 300px; display: block;" title="033" src="http://takinx.dcnblog.jp/radio_kit_/images/2018/02/12/033.jpg" alt="033" /></a></p>
<p>基板ナンバーRK-09,RK-11の2種。</p>
<p>トランスミッターも音色は球種に依存する。　電池管は電池管なりの音には為る。</p>
<p>繰り返すがSN面では　LM317Tを推奨する。</p></div>
]]>
</content>


    </entry>
    <entry>
        <title>はいぶりっどトランスミッター製作。　電池管1R5を12Ｖで発振させる。その1</title>
        <link rel="alternate" type="text/html" href="http://www.radiokits.jp/radio_kit_/2018/02/post-1.html" />
        <link rel="replies" type="text/html" href="http://www.radiokits.jp/radio_kit_/2018/02/post-1.html" thr:count="0" />
        <id>tag:app.dcnblog.jp,2003:post-58372060</id>
        <published>2018-02-11T19:00:42+09:00</published>
        <updated>2025-03-06T07:10:28+09:00</updated>
        <summary>********************************* はいぶりっど...</summary>
        <author>
            <name>takinx</name>
        </author>
        <category scheme="http://www.sixapart.com/ns/types#category" term="1Ｒ5(電池管)はいぶりっどトランスミッター" />
        <category scheme="http://www.sixapart.com/ns/types#category" term="pcb基板化　作業ファイル" />
        
        
<content type="html" xml:base="http://www.radiokits.jp/radio_kit_/">
<![CDATA[
<div xmlns="http://www.w3.org/1999/xhtml"><p><a href="http://takinx.dcnblog.jp/.shared/image.html?/photos/uncategorized/2025/03/06/20061225a.jpg" onclick="window.open( this.href, '_blank', 'width=300,height=429,scrollbars=no,resizable=no,toolbar=no,directories=no,location=no,menubar=no,status=no,left=0,top=0' ); return false"><img class="asset  asset-image at-xid-photo-59839351" style="width: 300px; display: block;" title="20061225a" src="http://takinx.dcnblog.jp/radio_kit_/images/2025/03/06/20061225a.jpg" alt="20061225a" /></a></p>
<p>*********************************</p>
<p>はいぶりっどトランスミッター製作プロジェクトの第2弾です。</p>
<p>第１弾は、トランスレスラジオ用真空管を採用した<a href="http://takinx.dcnblog.jp/radio_kit_/mic_43/">コレ</a>。</p>
<p><a href="http://takinx.dcnblog.jp/.shared/image.html?/photos/uncategorized/2018/02/11/027.jpg" onclick="window.open( this.href, '_blank', 'width=800,height=600,scrollbars=no,resizable=no,toolbar=no,directories=no,location=no,menubar=no,status=no,left=0,top=0' ); return false"><img class="asset  asset-image at-xid-photo-55549474" style="width: 300px; display: block;" title="027" src="http://takinx.dcnblog.jp/radio_kit_/images/2018/02/11/027.jpg" alt="027" /></a></p>
<p>第2弾は、電池管にしましょう。　電池管での7極管は1R5。中国球では1A2の型番になる。この1A2は、こここ数年で半田工作を始めた方には馴染みが薄いかも知れないが、学研のラジオキットにも採用されたほどの有名な球だ。1万キット販売されたようなので、随分と広く知られている。</p>
<p></p>
<p>電池管のこれはヒーターが1.4Vなので、乾電池で通電されることが多いが、3端子レギュレーターで1.4V生成させてみた。　LM317或いはLM338で生成するのが簡便だろう。</p>
<p>
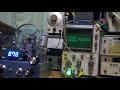
部品を実装しながら、ステップバイステップで作動確認を進める。</p>
<p>①まず、LM338で1.4Vを生成した。</p>
<p><a href="http://takinx.dcnblog.jp/.shared/image.html?/photos/uncategorized/2018/02/11/022.jpg" onclick="window.open( this.href, '_blank', 'width=800,height=600,scrollbars=no,resizable=no,toolbar=no,directories=no,location=no,menubar=no,status=no,left=0,top=0' ); return false"><img class="asset  asset-image at-xid-photo-55549476" style="width: 300px; display: block;" title="022" src="http://takinx.dcnblog.jp/radio_kit_/images/2018/02/11/022.jpg" alt="022" /></a></p>
<p>OSC波形がすっきりしないが、730kHzあたりでoscできていることが判る。すっきりしないのは何かが重畳しているからだとは想うが、計測が拙いかもしれない。(後述にあるが、ＬＭ338起因の広域ノイズがLM338の出力側から出ていることが計測できた.およそ0.2mV前後)</p>
<p></p>
<p>「1R5用のOSCコイルとして、NO88コイルが開発された」ってのはWEBに上がっているんじゃないかなあ？</p>
<p>88コイルでなくともOSC出来る。OSCコイルは写真参照。</p>
<p><a href="http://takinx.dcnblog.jp/.shared/image.html?/photos/uncategorized/2018/02/11/023.jpg" onclick="window.open( this.href, '_blank', 'width=800,height=600,scrollbars=no,resizable=no,toolbar=no,directories=no,location=no,menubar=no,status=no,left=0,top=0' ); return false"><img class="asset  asset-image at-xid-photo-55549479" style="width: 300px; display: block;" title="023" src="http://takinx.dcnblog.jp/radio_kit_/images/2018/02/11/023.jpg" alt="023" /></a></p>
<p>ラジオで聴いても弱くてよく判らないので、やはりトランジスタで増幅しよう。</p>
<p>②　bufferをつけた。　強くは為ったが周波数と波形がおかしい。　さて、、？？どうしてなの？</p>
<p></p>
<p><a href="http://takinx.dcnblog.jp/.shared/image.html?/photos/uncategorized/2018/02/11/024.jpg" onclick="window.open( this.href, '_blank', 'width=800,height=600,scrollbars=no,resizable=no,toolbar=no,directories=no,location=no,menubar=no,status=no,left=0,top=0' ); return false"><img class="asset  asset-image at-xid-photo-55549480" style="width: 300px; display: block;" title="024" src="http://takinx.dcnblog.jp/radio_kit_/images/2018/02/11/024.jpg" alt="024" /></a></p>
<p>③</p>
<p>buffer部で勝手に発振していることがわかった。基板のLC成分を受けて、相が360度廻るようだ。特定の周波数で廻ることも確認できた。基板ものはLC成分の影響でだいだいこのような挙動が興る。片面基板であればもっと安全だと想う。</p>
<p><a href="http://takinx.dcnblog.jp/.shared/image.html?/photos/uncategorized/2018/02/11/025.jpg" onclick="window.open( this.href, '_blank', 'width=800,height=600,scrollbars=no,resizable=no,toolbar=no,directories=no,location=no,menubar=no,status=no,left=0,top=0' ); return false"><img class="asset  asset-image at-xid-photo-55549481" style="width: 300px; display: block;" title="025" src="http://takinx.dcnblog.jp/radio_kit_/images/2018/02/11/025.jpg" alt="025" /></a></p>
<p></p>
<p><a href="http://takinx.dcnblog.jp/.shared/image.html?/photos/uncategorized/2018/02/11/026.jpg" onclick="window.open( this.href, '_blank', 'width=800,height=600,scrollbars=no,resizable=no,toolbar=no,directories=no,location=no,menubar=no,status=no,left=0,top=0' ); return false"><img class="asset  asset-image at-xid-photo-55549491" style="width: 300px; display: block;" title="026" src="http://takinx.dcnblog.jp/radio_kit_/images/2018/02/11/026.jpg" alt="026" /></a></p>
<p>トランジスタ1個で相が廻る。</p>
<p>④ bufferのエミッターコンデンサーを外した。　増幅度は30dBのままだが相の廻ことは止まった。コンデンサーを入れては駄目らしい。</p>
<p>1R5(1A2)には低周波信号を1Vほどいれている。　6BE6や6SA7など7極管は　個々のバラツキがあるが、概ね3V程度信号をいれてやる。MICゲインとしては70dBほど必要になる。　</p>
<p><a href="http://takinx.dcnblog.jp/.shared/image.html?/photos/uncategorized/2018/02/11/027_2.jpg" onclick="window.open( this.href, '_blank', 'width=800,height=600,scrollbars=no,resizable=no,toolbar=no,directories=no,location=no,menubar=no,status=no,left=0,top=0' ); return false"><img class="asset  asset-image at-xid-photo-55549494" style="width: 300px; display: block;" title="027_2" src="http://takinx.dcnblog.jp/radio_kit_/images/2018/02/11/027_2.jpg" alt="027_2" /></a></p>
<p><a href="http://takinx.dcnblog.jp/.shared/image.html?/photos/uncategorized/2018/02/11/028.jpg" onclick="window.open( this.href, '_blank', 'width=800,height=600,scrollbars=no,resizable=no,toolbar=no,directories=no,location=no,menubar=no,status=no,left=0,top=0' ); return false"><img class="asset  asset-image at-xid-photo-55549498" style="width: 300px; display: block;" title="028" src="http://takinx.dcnblog.jp/radio_kit_/images/2018/02/11/028.jpg" alt="028" /></a></p>
<p></p>
<p class="youtube"><img src="https://i.ytimg.com/vi/MZky_CpDOfg/default.jpg?w=425&amp;h=355&amp;player=1" alt="電池管1A2 実験　その1" /> <br /> <a href="http://jp.youtube.com/watch?v=MZky_CpDOfg" target="_blank" class="title" rel="noopener">YouTube: 電池管1A2 実験　その1</a></p>
<p class="youtube"></p>
<p class="youtube">動画のようにそれなりに音として飛んでいる。20cmアンテナで飛距離60cm。</p>
<p></p>
<p></p>
<p><a href="http://takinx.dcnblog.jp/.shared/image.html?/photos/uncategorized/2018/02/11/029_2.jpg" onclick="window.open( this.href, '_blank', 'width=800,height=207,scrollbars=no,resizable=no,toolbar=no,directories=no,location=no,menubar=no,status=no,left=0,top=0' ); return false"><img class="asset  asset-image at-xid-photo-55549948" style="width: 300px; display: block;" title="029_2" src="http://takinx.dcnblog.jp/radio_kit_/images/2018/02/11/029_2.jpg" alt="029_2" /></a></p>
<p>構成は上記のようにしたい。bufferだけで充分な気がするがfinalも載せておく。</p>
<p>◇7極真空管のoscコイルは、中波帯では全長の9～11%近傍にタップ点を持ってくる。　8%程度になると550kHz等バンド下側で感度不足が確認される。ST管とGT管ではタップ位置が異なるが中波は同じものでもまあ支障はない。短波帯になると露骨に差がでるのでST管用/GT管用とで別ける。</p>
<p>◇LM338もやはりノイズ発生源である。　波形で確認できる。たまたまヒーター回路で使ったが、ノイズ波形からすればVccには使いたくはない。</p>
<div class="Article__content">&nbsp;</div>
<p>************************************************************</p>
<p>電池管1T4 + 1R5 のワイヤレスマイク基板　:RK-343</p>
<p><a href="http://takinx.dcnblog.jp/.shared/image.html?/photos/uncategorized/2025/03/06/rk34305.jpg" onclick="window.open( this.href, '_blank', 'width=1200,height=898,scrollbars=no,resizable=no,toolbar=no,directories=no,location=no,menubar=no,status=no,left=0,top=0' ); return false"><img class="asset  asset-image at-xid-photo-59839350" style="width: 300px; display: block;" title="Rk34305" src="http://takinx.dcnblog.jp/radio_kit_/images/2025/03/06/rk34305.jpg" alt="Rk34305" /></a></p>
<p class="youtube"><img src="https://i.ytimg.com/vi/TmrvDrCXQTA/default.jpg?w=425&amp;h=355&amp;player=1" alt="「　電池管ラジオ　1T4+1U4　」の実験。　de radio kits in ja." /> <br /> <a href="http://jp.youtube.com/watch?v=TmrvDrCXQTA" target="_blank" class="title" rel="noopener">YouTube: 「　電池管ラジオ　1T4+1U4　」の実験。　de radio kits in ja.</a></p>
<p></p>
<p></p></div>
]]>
</content>


    </entry>
 
</feed>
