YouTube: 再生式はいぶりっどラジオ 1-V-2 デジタル表示

YouTube: 不動のspeech processor KP-12Aを直してみた。その2
YouTube: スピーカー ラジオ 自作 :ケースに合わせて基板作成した2例。

YouTube: This straight radio is having s-meter ; ta7642 radio 。RK-94v2


YouTube: 自作:ミニチュア真空管ラジオ. using bell brand speaker which is made in usa.
低周波発振器の出力インピーダンスは600オームです。この廉価品も600Ωです。

デジタルオシロの入力インピーダンスは1Mオームです。 低周波信号の波形観測には、インピダンス600オームで観測するのが基本です。 Z=600Ωの信号をZ=1MΩでみるような間抜けなことをしてますか?

あなた間違っていませんか? 道具は正しく使いたいですね。
******************************************************************
*************************************************
・SSGからの信号を電波で飛ばす方法についてお問い合わせを多数いただいたのでご紹介しておく。あちこちのwebを見ると修理する側のクオリティが随分と落ちている。
この2016年時点で「ラジオの調整」と検索してtopに出るsiteでは、テストループを所有していない。つまり素人が大きな顔で、記述している。素人でも正しく記述されていれば安全ではあるが、どうかな?
・業務でラジオ/テレコ修理を経験してこない素人が、エンジニアのマネで修理しているのが大多数の時代になり、「修理技術者もどき?」が幅を利かせているので、基本すぎるがあえてupしておく。掲示板で 当該ラジオ型式の修理方法のやりとりをして、掲示板での指示通りに修理したラジオを「さも己が直したようにしyahoo出品している様」をリアルにみてその経緯を知っていると 新しい分野のパロディに充分見える。「自力で直すチカラがなく他人に頼ってでも、小銭を稼ぎたい」とは日本人としてどうなのかな ??
・掲示板の指示に従って直されたラジオを手に入れた方は、該当掲示板でのやりとりを知ってどう思うかな?
・昭和35年の雑誌広告を撮像した。概ね56年前のことので当時10代のラジオ少年だったならば当然知っている内容だ。 現在30代ならば覚えておいたほうがよい。
・webをみるとプロの修理者は2人だけ居る。後は「モドキ」だろう。
***************************************************************
基本をひとつ。 低周波発振器の出口は、インピーダンス600オーム。アッテネータも600オーム。VTVMも600オーム。 この詳細はJIS参照。
オシロの入口は1Mオームと云うことは低周波信号の波形を1Mオーム(オシロ)で直接観測するのは間違い。オシロ波高をインピーダンス換算して値を算出していますか? 600オームで入れた信号を1Mオームで計れますか? これ計測基本だがこれもできなくて大きい顔するのが多数派。
AF信号を計測するにはVTVMは必須。 モドキはVTVMを持っていない。低周波の計測は600オーム。 JA1AMH高田OM愛用の 「リーダーの1Mオーム オシロを持っていない」のは100% 電気エンジニアではない。直視して良否判別しやすいのでLBO-551(552)がわざわざ開発(特許)されたことを知らぬのは、公務員等文系の電気計測とは無縁な人物。
VTVMを所有しないweb siteは間抜けと推認してもよい。LB0-551(552)を持たぬweb siteはAF観測しないweb siteと推認しても外れてはいない。
*******************************************************************
スーパーラジオでの調整方法である「トラッキングの仕方」⇒ ここ。
NHK 567kHzや594kHz 等の低い側で感度が不足する場合の対処もここに 明示してある。
*******************************************************************
①まず、三和無線測器研究所の広告。昭和35年の雑誌から。

標準信号発生器(SSG)とセットでループアンテナを使う。これは往時のラジオ技術者の基本。オイラも20代時代に教えられて使ってきた。(業務でラジオ修理)
「何故セットなのか?」は、画像の説明文を読めば理解できると想う。
50KC~なので455KCを飛ばせる。

と説明通りにSSG値を直読できる。無線電波を受信する機器に有線で信号を入れるのは不自然だよね。
オイラのは、目黒。商品名「テストループ」の文字が読める。
「ラジオ調整 テストループ」で検索すると、オイラのように「業務用テストループ」を所有するsiteが2人だけ見つかる。お一人はエンジニアだった方。もう一人は現プロ。他は無さそうだ。やはり、修理する側のクオリティがかなり落ちている。
ラジオ修理をしてyahoo出品する圧倒的大部分が「業務用テストループの所有はない」ようだな。

75ΩなのでNコネクター。 この頃は測定器VTVMもNコネクター。(現代はBNCだが)
3つ上の先輩のM氏も同僚のS氏も テストループで時折ラジオ調整しているといまも聞く。

「テストループを所有し使っているか?」 or 「持っていない」が、修理業務経験者と素人との違いだろう。
現在の入手方法は、年1回ていどみかけるYAHOO出品をgetするしかない。
見様見真似でラジオ修理を始めるのは当人の勝手だが、修理業務経験者なら半導体ラジオで1万台程度は軽く修理しているので、修理経験の桁が大幅に違うだろう。(2桁?3桁?)これだけの台数を趣味では治せない。(趣味では総時間が不足。)
「プロとアマチュアとは決定的に違う。どこが違うか?」 。プロは数をこなしているので、仕事が安定している。
ラジオ修理業務では、「標準信号発生器+テストループ」はmust。
②不幸にして「標準信号発生器+テストループ」でない場合にはJISC6102-2に準拠のこと。
JIS C6102-2によると
「標準無線周波入力信号は,適切な擬似アンテナ回路網を介して受信機のアンテナ端子に印加するか(第1部の表 III 及び図 5 参照),又は標準磁界発生器で信号を受信機の磁気アンテナに誘起させることによって印加する。」と定められている。
1部記載の擬似アンテナ回路網を見ると開放線の長さが、5m と10mでは 擬似アンテナが異なる。また受信周波数帯によって 回路定数も違う。 磁気アンテナのラジオだとテストループで調整するので擬似アンテナ回路網の組みなおしは不要だ。
「長さ5m程度の室内開放線アンテナのための100kHzから1.7MHzまでの周波数範囲の擬似アンテナ回路」では図示のようにCは無い。この場合はCが存在するとJISから離れた「自己流の好き勝手な調整方法」になってしまうので注意。
この「好き勝手な調整を行なう」のは知識不足に加えて民度も低い証になるので、ご注意されたし。
JISはここから読める。
開放線アンテナのない「市販ラジオ」では、標準磁界発生器で信号を受信機の磁気アンテナに誘起させることになる。 このためにテストループは必須であり、プロエンジニアはそれを使っている。受信機の磁気アンテナに誘起させることがポイント。
yahooで「ラジオ調整します」のようなものが出品されているが、それがJISにどのくらい準拠しているのは知りえない。プロエンジニアがJISを知らぬとは考えにくい。自称「プロ」の可能性が非常に高い。
③おまけに、松下電器からFMラジオキットが販売されていた写真。

ラジオ工作派なら、手に入れてみたいものだ。⇒半年後だが手に入れることができた。
2017年6月5日 追記
雑誌で、春日二郎OMが「模擬回路の さらなるダミー回路」に言及されていた。
***************************************
2017年11月11日追記
ここで取上げたように磁気アンテナ(バーアンテナ)のラジオ調整にはテストループがMUSTだ。日本工業規格がそう定めている。半導体ラジオ・チューナーには必須だ。
テストループは90年代には製造されていたかどうかも妖しい。 オイラのは1970年代後半の製造品。
目黒も松下も大松も標準信号発生器用テストループの製造は2000年には終了していた。販売在庫品も底をついた。現行流通品はゼロ状態だった。
さて、そのテストループが数十年振りに製造された。 祐徳電子さんから販売開始された。
自称「ラジオのプロ修理技術者」もこれが入手できるとホっとするだろう。プロエンジニアは会社の業務でラジオ調整(JIS)について教育され知識として身につけている。しかし、プロの修理業務経験のない方は、好き勝手に非JISな方法でラジオ調整する。 JISに非準拠ゆえに、自称「ラジオのプロ修理技術者」と呼ばれる。

◇箱を開けた
BNCケーブルも付属していた。
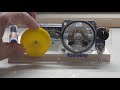
「パイプベンダーの曲げ型をよく見つけたなあ!!」と驚く。昨今、このような小さい直径の金型は市場にないと想うがどこで見つけてきたのか?

◇支柱は「円筒研磨加工後、ハードクロムメッキ処理」と加工プロ仕上げ。日本の会社よりメッキ処理が上手い、こりゃ驚いた。インローに拘って丸研してある。
通常は「ミガキ棒のままニッケルメッキ」が加工費としては安価。
下の写真のように、ハードクロムメッキ処理は国内では2000円以上の鍍金費用になる。
機械設計屋のオイラからみて「贅を尽くした」と想える。

◇スタンドベースは「電着カチオン塗装」。
「ここまで手間掛けるの?」が率直な感想。 今の時代なら黒染めで安価に済ませて終了だろう。


◇さて電波を飛ばしてみる。
正常、受信中。


◇ HF仕様だが、2mまでは信号を入れて確認してある。

6m,2mでバーアンテナを使うかどうか?

祐徳電子の社長さんは、松下電器の元エンジニア。 ラジオ系のエンジニアだ。 それゆえに良く判っている。
よく現代に復刻(復活)させたものだと感動し、感謝します。
復活の切っ掛けは、「数人の自称ラジオのプロ修理者」がテストループの必要なことをオイラのblogで知って、祐徳さんに、中古品/新品の捜索依頼を掛けたことがが起因。テストループの内部構造と材質はオイラからも情報提供は行なった。
ある意味で、自称「ラジオのプロ修理技術者」に感謝すべきだね。
機械設計屋が作るともっと手間を省いた安直なものになるだろう。
入手希望者は、祐徳さんに問い合わせのこと。
***************************
MWでのトラッキングについてはここに列記済み。

YouTube: AM transmitter ,using mc1496.