<?xml version="1.0" encoding="utf-8"?>
<feed xmlns="http://www.w3.org/2005/Atom" xmlns:dc="http://purl.org/dc/elements/1.1/" xmlns:thr="http://purl.org/syndication/thread/1.0">
    <title>RADIO KITS IN JA　: 真空管ラジオ　2球スーパー (6BY6+6GH8)</title>
    <link rel="self" type="application/atom+xml" href="http://www.radiokits.jp/radio_kit_/2_2/atom.xml" />
    <link rel="alternate" type="text/html" href="http://www.radiokits.jp/radio_kit_/" />
    
    <id>tag:app.dcnblog.jp,2003:weblog-358158</id>
    <updated>2016-10-14T06:41:56+09:00</updated>
    <subtitle>信州安曇野発アナログ工作中心blogです。電子工作派にお手伝い用基板１、基板2、基板3、基板4を領布中
 6Z-DH3Aのヒーターピンは必ず1番を接地。間抜けは6番ピンを接地する　　6Z-DH3Aのピン　接続情報 　amazon等での転売shopが多数ありますが、私とは無関係です。騙されぬようにご注意ください。トランジスタラジオキット,真空管短波ラジオ、真空管レフレックスラジオ、AMワイヤレスマイク、FMワイヤレスマイク、12AU7ダイレクトコンバージョン製作。LC7265ラジオ周波数表示器、ミニワッター、トランジスタアンプ、メロディic スピーカーの鳴る単球ラジオなど計 610例。 真空管ラジオ修理記やFMチューナー修理記など。20代は半導体ラジオ修理技術者でした。FA機械設計屋を35年やってます。画像多数にてPC推奨します。 資料画像等はお持ち帰りいただいてOKです。記事にする折には、ご一報ください。
since 2011/Aug</subtitle>
    <entry>
        <title>菊水　テストループ　SA100。　JISに準拠。        ラジオ調整の基本。</title>
        <link rel="alternate" type="text/html" href="http://www.radiokits.jp/radio_kit_/2016/10/sa100jis-3987.html" />
        <link rel="replies" type="text/html" href="http://www.radiokits.jp/radio_kit_/2016/10/sa100jis-3987.html" thr:count="0" />
        <id>tag:app.dcnblog.jp,2003:post-57690019</id>
        <published>2016-10-14T06:41:56+09:00</published>
        <updated>2022-08-31T09:15:50+09:00</updated>
        <summary>＊＊＊＊＊＊＊＊＊＊＊＊＊＊＊＊＊＊＊＊＊＊＊＊＊＊＊＊ 菊水　テストループ　S...</summary>
        <author>
            <name>takinx</name>
        </author>
        <category scheme="http://www.sixapart.com/ns/types#category" term="1-V-2 高一再生式グリッド・リーク検波　ST管3球ラジオ" />
        <category scheme="http://www.sixapart.com/ns/types#category" term="1R-STD 単球　再生式ラジオキット" />
        <category scheme="http://www.sixapart.com/ns/types#category" term="1RW-DX    単球　再生式ラジオキット　(6EH8)" />
        <category scheme="http://www.sixapart.com/ns/types#category" term="3DC-STD　真空管　高1ゲルマ検波ラジオキット　" />
        <category scheme="http://www.sixapart.com/ns/types#category" term="3S-STD 真空管　3球スーパーラジオキット   " />
        <category scheme="http://www.sixapart.com/ns/types#category" term="5球スーパー　のメンテナンス" />
        <category scheme="http://www.sixapart.com/ns/types#category" term="5球スーパー　改造修理" />
        <category scheme="http://www.sixapart.com/ns/types#category" term="5球スーパーのメンテナンス　2号機" />
        <category scheme="http://www.sixapart.com/ns/types#category" term="5球スーパーのメンテナンス　3号機" />
        <category scheme="http://www.sixapart.com/ns/types#category" term="6TR-STD  6石　トランジスタラジオキット" />
        <category scheme="http://www.sixapart.com/ns/types#category" term="6石スーパーラジオ　キット：　チェリー　CK-606" />
        <category scheme="http://www.sixapart.com/ns/types#category" term="AMラジオキット　TECSUN社製　2P3" />
        <category scheme="http://www.sixapart.com/ns/types#category" term="Felip  5球ST管　スーパー改造製作" />
        <category scheme="http://www.sixapart.com/ns/types#category" term="Genny unit 01 (再生式ラジオ)" />
        <category scheme="http://www.sixapart.com/ns/types#category" term="KIT-006D FM/MW/SW1/SW2 4バンドラジオキット" />
        <category scheme="http://www.sixapart.com/ns/types#category" term="KIT-10 　中波ラジオ　1IC+2TR" />
        <category scheme="http://www.sixapart.com/ns/types#category" term="KIT-210  AM/FM ラジオ" />
        <category scheme="http://www.sixapart.com/ns/types#category" term="KIT-619  6石　AMトランジスタラジオキット" />
        <category scheme="http://www.sixapart.com/ns/types#category" term="KIT-9 6石　AMトランジスタラジオキット" />
        <category scheme="http://www.sixapart.com/ns/types#category" term="PJ-80 ARDF 3.5Mhz を7Mhz化に改造" />
        <category scheme="http://www.sixapart.com/ns/types#category" term="PJ-80 ARDF 3.5Mhz レシーバーキット" />
        <category scheme="http://www.sixapart.com/ns/types#category" term="アイテック電子研究所 新SR-7  7Mhz レシーバーキット" />
        <category scheme="http://www.sixapart.com/ns/types#category" term="イスペット　6石トランジスタ　AMラジオ　キット CR-P461A" />
        <category scheme="http://www.sixapart.com/ns/types#category" term="キングエース　KF506  6石トラジスタ　AMラジオキット" />
        <category scheme="http://www.sixapart.com/ns/types#category" term="クライスラーのキャビネットラジオ　" />
        <category scheme="http://www.sixapart.com/ns/types#category" term="サイテック　7Mhz ダイレクトコンバージョン　Comet40" />
        <category scheme="http://www.sixapart.com/ns/types#category" term="サイテック　7Mhzダイレクトコンバージョン SPARROW40-E" />
        <category scheme="http://www.sixapart.com/ns/types#category" term="サトー電気　　7Mhz　ダイレクトコンバージョンキット" />
        <category scheme="http://www.sixapart.com/ns/types#category" term="チェリー　CK-411 4石　AMトランジスタ　ラジオ" />
        <category scheme="http://www.sixapart.com/ns/types#category" term="チェリー　KM-88　8石トランジスタ　AMラジオキット" />
        <category scheme="http://www.sixapart.com/ns/types#category" term="テクノキット　HR-981DX　 AMラジオキット" />
        <category scheme="http://www.sixapart.com/ns/types#category" term="ハムズオフィス　HK-8 　中･短波受信機キット  0-V-1" />
        <category scheme="http://www.sixapart.com/ns/types#category" term="フォアーランド　FR-702 7石トランジスタ　AMラジオ キット" />
        <category scheme="http://www.sixapart.com/ns/types#category" term="フォアーランド　FR-7100  FM/AM　ラジオキット" />
        <category scheme="http://www.sixapart.com/ns/types#category" term="フォアーランド　FR-7300 FM/AM 　ラジオ キット" />
        <category scheme="http://www.sixapart.com/ns/types#category" term="ミズホ通信研究所　中波帯ＡＭストレートラジオ" />
        <category scheme="http://www.sixapart.com/ns/types#category" term="メンテナンス　TRIO AF-10" />
        <category scheme="http://www.sixapart.com/ns/types#category" term="メンテナンス　TRIO AF-20" />
        <category scheme="http://www.sixapart.com/ns/types#category" term="メンテナンス　TRIO AF-20 2号機" />
        <category scheme="http://www.sixapart.com/ns/types#category" term="メンテナンス　TRIO AF-20 3号機" />
        <category scheme="http://www.sixapart.com/ns/types#category" term="メンテナンス　八欧電機　Lー65　AM/SW/FM" />
        <category scheme="http://www.sixapart.com/ns/types#category" term="メンテナンス　春日無線　3バンドラジオ　AF-252" />
        <category scheme="http://www.sixapart.com/ns/types#category" term="メンテナンス　真空管ラジオ  UA-625" />
        <category scheme="http://www.sixapart.com/ns/types#category" term="メンテナンス　真空管ラジオ　FM-11" />
        <category scheme="http://www.sixapart.com/ns/types#category" term="メンテナンス　真空管ラジオ　ONKYO OS-195" />
        <category scheme="http://www.sixapart.com/ns/types#category" term="レフレックス +再生　1球 真空管ラジオ (6GH8)" />
        <category scheme="http://www.sixapart.com/ns/types#category" term="レフレックス 1球 真空管 ラジオ (6GH8) 2号機" />
        <category scheme="http://www.sixapart.com/ns/types#category" term="レフレックス 1球 真空管 ラジオ (6GX7)" />
        <category scheme="http://www.sixapart.com/ns/types#category" term="ワンダーキット　DSPラジオキット　DS-RAD01" />
        <category scheme="http://www.sixapart.com/ns/types#category" term="真空管ラジオ　2球スーパー (6BY6+6GH8)" />
        <category scheme="http://www.sixapart.com/ns/types#category" term="真空管ラジオ　4球スーパー(6BY6,6JC6,6AL5,6AB8)" />
        <category scheme="http://www.sixapart.com/ns/types#category" term="真空管ラジオ　5球スーパー 1号機(6BY6,6BJ6,EBF80,6J4,6AB8)" />
        <category scheme="http://www.sixapart.com/ns/types#category" term="録録　★" />
        
        
<content type="html" xml:base="http://www.radiokits.jp/radio_kit_/">
<![CDATA[
<div xmlns="http://www.w3.org/1999/xhtml"><p></p>
<p>＊＊＊＊＊＊＊＊＊＊＊＊＊＊＊＊＊＊＊＊＊＊＊＊＊＊＊＊</p>
<p>&nbsp;菊水　テストループ　SA100.</p>
<p>JIS C6102-1998準拠。</p>
<p>菊水さんから写真はお借りした。</p>
<p><a href="http://takinx.dcnblog.jp/.shared/image.html?/photos/uncategorized/2016/10/14/ksgoption.jpg" onclick="window.open( this.href, '_blank', 'width=441,height=204,scrollbars=no,resizable=no,toolbar=no,directories=no,location=no,menubar=no,status=no,left=0,top=0' ); return false"><img class="asset  asset-image at-xid-photo-54189947" style="width: 300px; display: block;" title="Ksgoption" src="http://takinx.dcnblog.jp/radio_kit_/images/2016/10/14/ksgoption.jpg" alt="Ksgoption" /></a></p>
<p>先日、<a href="http://takinx.dcnblog.jp/radio_kit_/2016/10/post-333b.html" target="_self">ラジオ調整の基本</a>としてテストループで電波を飛ばすことを記した。</p>
<p>バーアンテナで受信するラジオのために、テストループのインダクタンスもJISで定められている。JISの文面にあるようにトランジスタラジオ調整ではmustの設備になる。これを所有するのが、プロ。</p>
<p>家電メーカーでは、<a href="http://kikakurui.com/c6/C6102-1-1998-01.html" target="_self">JIS</a>に準拠してラジオ調整を行なう。オイラも使ってきた。</p>
<p>修理業務の未経験者は、テストループの存在そのものを知らないね。</p>
<p>テストループを用いてラジオ調整することができるのは、国内では4人もいないようだ。ラジオ整備品を出品する大多数は測定器が無いようだね。文面がそうなっている。 修理する側の技術水準がだんだんと低くなっているので、修理済み品を入手するときは慎重に。ヘタレ品を掴むのはご自由に。</p>
<p>＊＊＊＊＊＊＊＊＊＊＊＊＊＊＊＊＊＊＊＊＊＊＊＊＊＊＊＊＊＊＊＊＊＊＊＊＊＊＊＊＊</p>
<p>オイラのは目黒のテストループ。磁気アンテナでのラジオ調整用にJISで定めている道具。</p>
<p><a href="http://takinx.dcnblog.jp/.shared/image.html?/photos/uncategorized/2016/10/14/014.jpg" onclick="window.open( this.href, '_blank', 'width=800,height=600,scrollbars=no,resizable=no,toolbar=no,directories=no,location=no,menubar=no,status=no,left=0,top=0' ); return false"><img class="asset  asset-image at-xid-photo-54199915" style="width: 300px; display: block;" title="014" src="http://takinx.dcnblog.jp/radio_kit_/images/2016/10/14/014.jpg" alt="014" /></a></p>
<p></p></div>
]]>
</content>


    </entry>
    <entry>
        <title>2球スーパー 2号機　（バンド内の感度凸凹)</title>
        <link rel="alternate" type="text/html" href="http://www.radiokits.jp/radio_kit_/2012/06/2-2-6ef7.html" />
        <link rel="replies" type="text/html" href="http://www.radiokits.jp/radio_kit_/2012/06/2-2-6ef7.html" thr:count="0" />
        <id>tag:app.dcnblog.jp,2003:post-46165951</id>
        <published>2012-06-09T09:14:56+09:00</published>
        <updated>2013-05-05T11:54:20+09:00</updated>
        <summary>いやあ、、、、。今日は、雨降りですね。 真空管2球スーパー（6BY6+6GH8)...</summary>
        <author>
            <name>takinx</name>
        </author>
        <category scheme="http://www.sixapart.com/ns/types#category" term="真空管ラジオ　2球スーパー (6BY6+6GH8)" />
        
        
<content type="html" xml:base="http://www.radiokits.jp/radio_kit_/">
<![CDATA[
<div xmlns="http://www.w3.org/1999/xhtml"><p><a href="http://takinx.dcnblog.jp/.shared/image.html?/photos/uncategorized/2012/06/09/0920.jpg" onclick="window.open(this.href, '_blank', 'width=800,height=600,scrollbars=no,resizable=no,toolbar=no,directories=no,location=no,menubar=no,status=no,left=0,top=0'); return false"></a>いやあ、、、、。今日は、雨降りですね。</p>

<p></p>

<p>真空管2球スーパー（6BY6+6GH8)の感度ぐあいを撮像してみました。</p>

<p><a href="http://takinx.dcnblog.jp/.shared/image.html?/photos/uncategorized/2012/06/09/0520_2.jpg" onclick="window.open(this.href, '_blank', 'width=800,height=600,scrollbars=no,resizable=no,toolbar=no,directories=no,location=no,menubar=no,status=no,left=0,top=0'); return false"><img height="225" border="0" width="300" src="http://takinx.dcnblog.jp/radio_kit_/images/2012/06/09/0520_2.jpg" alt="0520_2" title="0520_2" /></a> </p>

<p>↑このラジオの下限。バルボルの「5」に指針が来るようにVRをあわせてました。</p>

<p>以降、VRは触らずに、周波数を変えて「感度の凸凹」を見ていきます。</p>

<p></p>

<p><a href="http://takinx.dcnblog.jp/.shared/image.html?/photos/uncategorized/2012/06/09/0720.jpg" onclick="window.open(this.href, '_blank', 'width=800,height=600,scrollbars=no,resizable=no,toolbar=no,directories=no,location=no,menubar=no,status=no,left=0,top=0'); return false"><img height="225" border="0" width="300" src="http://takinx.dcnblog.jp/radio_kit_/images/2012/06/09/0720.jpg" alt="0720" title="0720" /></a> </p>

<p>↑F=720Khz</p>

<p></p>

<p><a href="http://takinx.dcnblog.jp/.shared/image.html?/photos/uncategorized/2012/06/09/0920.jpg" onclick="window.open(this.href, '_blank', 'width=800,height=600,scrollbars=no,resizable=no,toolbar=no,directories=no,location=no,menubar=no,status=no,left=0,top=0'); return false"><img height="225" border="0" width="300" src="http://takinx.dcnblog.jp/radio_kit_/images/2012/06/09/0920.jpg" alt="0920" title="0920" /></a></p>

<p>↑F=920Khz</p>

<p></p>

<p></p>

<p><a href="http://takinx.dcnblog.jp/.shared/image.html?/photos/uncategorized/2012/06/09/1120.jpg" onclick="window.open(this.href, '_blank', 'width=800,height=600,scrollbars=no,resizable=no,toolbar=no,directories=no,location=no,menubar=no,status=no,left=0,top=0'); return false"><img height="225" border="0" width="300" src="http://takinx.dcnblog.jp/radio_kit_/images/2012/06/09/1120.jpg" alt="1120" title="1120" /></a> </p>

<p></p>

<p>↑F=1120Khz</p>

<p></p>

<p></p>

<p></p>

<p></p>

<p><a href="http://takinx.dcnblog.jp/.shared/image.html?/photos/uncategorized/2012/06/09/1320.jpg" onclick="window.open(this.href, '_blank', 'width=800,height=600,scrollbars=no,resizable=no,toolbar=no,directories=no,location=no,menubar=no,status=no,left=0,top=0'); return false"><img height="225" border="0" width="300" src="http://takinx.dcnblog.jp/radio_kit_/images/2012/06/09/1320.jpg" alt="1320" title="1320" /></a> </p>

<p></p>

<p></p>

<p></p>

<p>↑F=1320Khz</p>

<p></p>

<p></p>

<p><a href="http://takinx.dcnblog.jp/.shared/image.html?/photos/uncategorized/2012/06/09/1520.jpg" onclick="window.open(this.href, '_blank', 'width=800,height=600,scrollbars=no,resizable=no,toolbar=no,directories=no,location=no,menubar=no,status=no,left=0,top=0'); return false"><img height="225" border="0" width="300" src="http://takinx.dcnblog.jp/radio_kit_/images/2012/06/09/1520.jpg" alt="1520" title="1520" /></a> </p>

<p></p>

<p>↑F=1520Khz</p>

<p>こんな感じのトラッキングにしてあります。</p>

<p>トランジスタラジオですと、もっと凸凹がありませんね。</p>

<p><strong>＊＊＊＊＊＊＊＊＊＊＊＊＊＊＊＊＊＊＊＊＊＊＊＊＊＊＊＊＊＊＊</strong></p>

<p><strong>↓OSCコイルで「受信可能なバンド下限」を530Khzにあわせた写真を1枚</strong></p>

<p><strong>upしておきます。</strong></p>

<p>(耳が悪くなってます。）</p>

<p><strong><a href="http://takinx.dcnblog.jp/.shared/image.html?/photos/uncategorized/2012/06/09/0530osc.jpg" onclick="window.open(this.href, '_blank', 'width=800,height=600,scrollbars=no,resizable=no,toolbar=no,directories=no,location=no,menubar=no,status=no,left=0,top=0'); return false"><img height="225" border="0" width="300" src="http://takinx.dcnblog.jp/radio_kit_/images/2012/06/09/0530osc.jpg" alt="0530osc" title="0530osc" /></a> </strong></p>

<p><strong>＊＊＊＊＊＊＊＊＊＊＊＊＊＊＊＊＊＊＊＊＊＊＊＊＊＊＊＊＊＊＊＊＊</strong></p>

<p></p>

<p><strong><a href="http://takinx.dcnblog.jp/.shared/image.html?/photos/uncategorized/2012/06/09/0530orin.jpg" onclick="window.open(this.href, '_blank', 'width=800,height=600,scrollbars=no,resizable=no,toolbar=no,directories=no,location=no,menubar=no,status=no,left=0,top=0'); return false"><img height="225" border="0" width="300" src="http://takinx.dcnblog.jp/radio_kit_/images/2012/06/09/0530orin.jpg" alt="0530orin" title="0530orin" /></a> </strong></p>

<p><strong></strong></p>

<p><strong>↑比較のための撮像</strong></p>

<p>（<strong>バンド下限520khzで調整済み</strong>。)</p>

<p>オイラ、「局発は、感度優先」であわせてます。</p>

<p>昔の書籍を見ましても、「コイルのタップ位置が重要」と書いてありますね。</p>

<p>実際その通りでして、カソードと接続している「インダクタンス」が重要ですね。</p>

<p>********************************************************</p>

<p><a href="http://takinx.dcnblog.jp/"><span style="font-size: 1.4em;"><strong>TOP PAGE</strong></span></a></p>

<p></p>

<p><strong></strong></p></div>
]]>
</content>


    </entry>
    <entry>
        <title>2球スーパー 2号機　　その2　(6BY6+6GH8)</title>
        <link rel="alternate" type="text/html" href="http://www.radiokits.jp/radio_kit_/2012/06/2-22-99e1.html" />
        <link rel="replies" type="text/html" href="http://www.radiokits.jp/radio_kit_/2012/06/2-22-99e1.html" thr:count="0" />
        <id>tag:app.dcnblog.jp,2003:post-46138231</id>
        <published>2012-06-06T00:00:24+09:00</published>
        <updated>2013-05-05T11:54:32+09:00</updated>
        <summary>2球(6BY6+6GH8)のスーパーです。 定時に帰宅できたので、トラッキングを...</summary>
        <author>
            <name>takinx</name>
        </author>
        <category scheme="http://www.sixapart.com/ns/types#category" term="真空管ラジオ　2球スーパー (6BY6+6GH8)" />
        
        
<content type="html" xml:base="http://www.radiokits.jp/radio_kit_/">
<![CDATA[
<div xmlns="http://www.w3.org/1999/xhtml"><p>2球(6BY6+6GH8)のスーパーです。</p>

<p>定時に帰宅できたので、トラッキングを済ませました。</p>

<p>で、普通に鳴ってます。</p>

<p>手元に残っている真空管ラジオとしては、ようやく10台目に為りました。</p>

<p></p>

<p></p>

<p><a href="http://takinx.dcnblog.jp/.shared/image.html?/photos/uncategorized/2012/06/05/009.jpg" onclick="window.open(this.href, '_blank', 'width=800,height=600,scrollbars=no,resizable=no,toolbar=no,directories=no,location=no,menubar=no,status=no,left=0,top=0'); return false"><img height="225" border="0" width="300" src="http://takinx.dcnblog.jp/radio_kit_/images/2012/06/05/009.jpg" alt="009" title="009" /></a> </p>

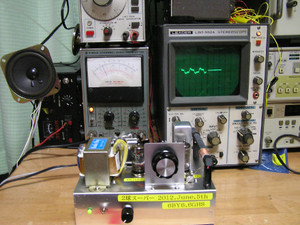
<p>↑いつものように、sp端でのバルボル値。(VRは絞る)</p>

<p>0.003Vレンジですので、0.8mVくらいでしょうか、、。</p>

<p></p>

<p><a href="http://takinx.dcnblog.jp/.shared/image.html?/photos/uncategorized/2012/06/05/010.jpg" onclick="window.open(this.href, '_blank', 'width=800,height=600,scrollbars=no,resizable=no,toolbar=no,directories=no,location=no,menubar=no,status=no,left=0,top=0'); return false"></a></p>

<p></p>

<p><a href="http://takinx.dcnblog.jp/.shared/image.html?/photos/uncategorized/2012/06/05/011.jpg" onclick="window.open(this.href, '_blank', 'width=800,height=600,scrollbars=no,resizable=no,toolbar=no,directories=no,location=no,menubar=no,status=no,left=0,top=0'); return false"><img height="225" border="0" width="300" src="http://takinx.dcnblog.jp/radio_kit_/images/2012/06/05/011.jpg" alt="011" title="011" /></a> </p>

<p><a href="http://takinx.dcnblog.jp/.shared/image.html?/photos/uncategorized/2012/06/05/012.jpg" onclick="window.open(this.href, '_blank', 'width=800,height=600,scrollbars=no,resizable=no,toolbar=no,directories=no,location=no,menubar=no,status=no,left=0,top=0'); return false"><img height="225" border="0" width="300" src="http://takinx.dcnblog.jp/radio_kit_/images/2012/06/05/012.jpg" alt="012" title="012" /></a> </p>

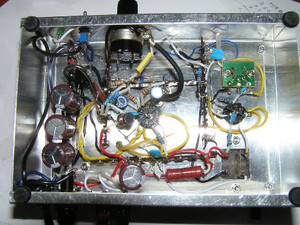
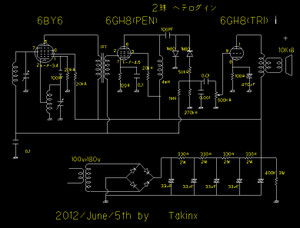
<p>↑平滑は3段（回路図では4段になってます)にしました。</p>

<p>0.8mVなので、このまま3段で行こうと想います。</p>

<p><a href="http://takinx.dcnblog.jp/.shared/image.html?/photos/uncategorized/2012/06/05/005_4.jpg" onclick="window.open(this.href, '_blank', 'width=780,height=593,scrollbars=no,resizable=no,toolbar=no,directories=no,location=no,menubar=no,status=no,left=0,top=0'); return false"><img height="228" border="0" width="300" src="http://takinx.dcnblog.jp/radio_kit_/images/2012/06/05/005_4.jpg" alt="005_4" title="005_4" /></a> </p>

<p>↑回路。いつもの倍電圧。いつものように、Di直後に50kΩ。</p>

<p>本機は、Qダンプ無しです。(1号機はダンプ抵抗82KΩ)</p>

<p><a href="http://takinx.dcnblog.jp/.shared/image.html?/photos/uncategorized/2012/06/05/013.jpg" onclick="window.open(this.href, '_blank', 'width=800,height=600,scrollbars=no,resizable=no,toolbar=no,directories=no,location=no,menubar=no,status=no,left=0,top=0'); return false"><img height="225" border="0" width="300" src="http://takinx.dcnblog.jp/radio_kit_/images/2012/06/05/013.jpg" alt="013" title="013" /></a> </p>

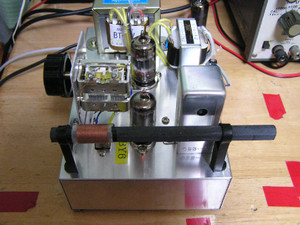
<p>↑6BY6⇔6GH8間は60mm。</p>

<p><a href="http://takinx.dcnblog.jp/.shared/image.html?/photos/uncategorized/2012/06/05/014.jpg" onclick="window.open(this.href, '_blank', 'width=800,height=600,scrollbars=no,resizable=no,toolbar=no,directories=no,location=no,menubar=no,status=no,left=0,top=0'); return false"><img height="225" border="0" width="300" src="http://takinx.dcnblog.jp/radio_kit_/images/2012/06/05/014.jpg" alt="014" title="014" /></a> </p>

<p>IFT端子から、5極部の出力ラインまで70mm。</p>

<p>1号機が「IFT端子⇔5極部の出力ライン　　45mm」で、正帰還して回り込んだので</p>

<p>2号機は70mmまで離して見ました。</p>

<p>結果、正帰還せずに鳴っています。(ダンプ抵抗　不要)</p>

<p>もう少し近付けてもよいですね。(60mmでもokぽい感じです)</p>

<p>＊＊＊＊＊＊＊＊＊＊＊＊＊＊＊＊＊＊＊＊＊＊＊＊＊＊＊＊＊＊＊＊＊＊</p>

<p>このIFTを、この電圧で使う場合。</p>

<p>「IFT端子⇔5極部の出力ライン」が50mmより近いようですと、隔壁（シールド板）が必要ですね。　　安くて魅力のあるIFTです。</p>

<p>＊＊＊＊＊＊＊＊＊＊＊＊＊＊＊＊＊＊＊＊＊＊＊＊＊＊＊＊＊＊＊＊＊＊</p>

<p>6GH8は、<a href="http://takinx.dcnblog.jp/radio_kit_/1/">「レフレックス +再生」</a>　でもチカラを発揮してくれてます。</p>

<p><del>音量面では、2号機＞1号機です。</del></p>

<p><del>ダンプの有無が、はっきり出ています。 </del></p>

<p>両者を比較測定したら、差は2dbでした。誤差範囲ですね。</p>

<p><a href="http://takinx.dcnblog.jp/.shared/image.html?/photos/uncategorized/2012/06/05/010.jpg" onclick="window.open(this.href, '_blank', 'width=800,height=600,scrollbars=no,resizable=no,toolbar=no,directories=no,location=no,menubar=no,status=no,left=0,top=0'); return false"><img height="225" border="0" width="300" src="http://takinx.dcnblog.jp/radio_kit_/images/2012/06/05/010.jpg" alt="010" title="010" /></a></p>

<p>3SーSTDの<a href="http://takinx.dcnblog.jp/radio_kit_/3sstd_3/">製作BLOG</a>にも書いてありますが、</p>

<p>トラッキングは、OSCコアを感度優先で合わせるのがポイントですね。</p>

<p>インダクタンスの増減で周波数も変わりますが、耳も変わりますね。</p>

<p>(このOSCの特徴なのか？　真空管特有なのか？？）</p>

<p>昔の書籍を見ましても、「コイルのタップ位置が重要」と書いてありますね。</p>

<p>実際その通りでして、カソードと接続している「インダクタンス」が重要ですね。</p>

<p>トランジスタラジオとは、やや挙動が違いますね。</p>

<p>ラジオは調整している時が、面白いですね。</p>

<p><strong><span style="color: #0066ff;">＊＊＊＊＊＊＊＊＊＊＊＊＊＊＊＊＊＊＊＊＊＊＊＊＊＊＊＊＊＊＊＊</span></strong></p>

<p><strong><span style="font-size: 1.2em;">2012/Aug/30追記</span></strong></p>

<p><strong><span style="font-size: 1.2em;">「真空管6688」を使った再生式3球ラジオも製作しました。⇒<a href="http://takinx.dcnblog.jp/radio_kit_/3668866886lf8/">ここ</a>です</span></strong></p>

<p><a href="http://takinx.dcnblog.jp/"><span style="font-size: 1.4em;"><strong>TOP PAGE</strong></span></a></p>

<p><strong><span style="font-size: 1.2em;"><br /></span></strong></p></div>
]]>
</content>


    </entry>
    <entry>
        <title>2球スーパー 2号機 (6BY6+6GH8)　その1</title>
        <link rel="alternate" type="text/html" href="http://www.radiokits.jp/radio_kit_/2012/06/2-3506.html" />
        <link rel="replies" type="text/html" href="http://www.radiokits.jp/radio_kit_/2012/06/2-3506.html" thr:count="0" />
        <id>tag:app.dcnblog.jp,2003:post-46124119</id>
        <published>2012-06-04T13:00:23+09:00</published>
        <updated>2013-05-05T11:54:48+09:00</updated>
        <summary>前回の真空管2球スーパーが普通に鳴っているので、 複合管の球種を変えて2号機をつ...</summary>
        <author>
            <name>takinx</name>
        </author>
        <category scheme="http://www.sixapart.com/ns/types#category" term="真空管ラジオ　2球スーパー (6BY6+6GH8)" />
        
        
<content type="html" xml:base="http://www.radiokits.jp/radio_kit_/">
<![CDATA[
<div xmlns="http://www.w3.org/1999/xhtml"><p>前回の<a href="http://takinx.dcnblog.jp/radio_kit_/2_1/">真空管2球スーパー</a>が普通に鳴っているので、</p>

<p>複合管の球種を変えて2号機をつくりはじめました。</p>

<p><a href="http://takinx.dcnblog.jp/.shared/image.html?/photos/uncategorized/2012/06/04/001.jpg" onclick="window.open(this.href, '_blank', 'width=800,height=600,scrollbars=no,resizable=no,toolbar=no,directories=no,location=no,menubar=no,status=no,left=0,top=0'); return false"></a>休日や夕食後のラジオ放送は、6BY6+6BA8の2球スーパーで聴いています。</p>

<p>聴き易い音で鳴っています。</p>

<p><strong>2球スーパー&nbsp; 　2号機。</strong></p>

<p></p>

<p>①「自分で、局発コイルを巻きだした」のですが、<strong>不器用でまとまりませんでした</strong>。</p>

<p>(2号機で、コイル実験したかったのですが、諦めます)</p>

<p>で、ラジオ少年のOSCコイルのお世話になっています。</p>

<p>②球は、<strong>6BY6＋6GH8</strong></p>

<p><a href="http://takinx.dcnblog.jp/.shared/image.html?/photos/uncategorized/2012/06/04/001.jpg" onclick="window.open(this.href, '_blank', 'width=800,height=600,scrollbars=no,resizable=no,toolbar=no,directories=no,location=no,menubar=no,status=no,left=0,top=0'); return false"><img height="225" border="0" width="300" src="http://takinx.dcnblog.jp/radio_kit_/images/2012/06/04/001.jpg" alt="001" title="001" /></a></p>

<p>↑左が1号機。　右が今製作。</p>

<p>「複合管⇔6BY6」を少し縮めて60mmにしてみました。</p>

<p>6BY6⇒IFT⇒5極部⇒3極部の構成です。(1号機と同じ構成)</p>

<p>IFTは、中国製633-2(前回の残りですね)</p>

<p><a href="http://takinx.dcnblog.jp/.shared/image.html?/photos/uncategorized/2012/06/05/008.jpg" onclick="window.open(this.href, '_blank', 'width=800,height=600,scrollbars=no,resizable=no,toolbar=no,directories=no,location=no,menubar=no,status=no,left=0,top=0'); return false"><img height="225" border="0" width="300" src="http://takinx.dcnblog.jp/radio_kit_/images/2012/06/05/008.jpg" alt="008" title="008" /></a> </p>

<p><a href="http://takinx.dcnblog.jp/.shared/image.html?/photos/uncategorized/2012/06/10/026_3.jpg" onclick="window.open(this.href, '_blank', 'width=800,height=600,scrollbars=no,resizable=no,toolbar=no,directories=no,location=no,menubar=no,status=no,left=0,top=0'); return false"><img height="225" border="0" width="300" src="http://takinx.dcnblog.jp/radio_kit_/images/2012/06/10/026_3.jpg" alt="026_3" title="026_3" /></a> </p>

<p>付属のゴムの劣化に留意。</p>

<p>コアと樹脂ネジの同軸度が？？なので、調整時に注意。</p>

<p></p>

<p></p>

<p>＊＊＊＊＊＊＊＊＊＊＊＊＊＊＊＊＊＊＊＊＊＊＊＊＊＊＊＊＊＊＊＊</p>

<p>1号機では、<strong>「IFT⇒3極部⇒5極部」</strong>だと発振してしまい、</p>

<p>ダンプ抵抗をさらに小さく（ゲインが下がる)して回避するしか手立てがありませんでした。</p>

<p>↑だと、総合ゲインが小さくなってしまったので、<strong>「IFT⇒5極部⇒3極部」</strong>にしてあります</p>

<p></p>

<p>3極部の方が、モー値が小さくてゲイン小なので、発振から縁遠いはずなのですが、、、。</p>

<p>g1-pの容量が効いてくるのか？？、、、。</p>

<p>＊＊＊＊＊＊＊＊＊＊＊＊＊＊＊＊＊＊＊＊＊＊＊＊＊＊＊＊＊＊＊＊</p>

<p><a href="http://takinx.dcnblog.jp/.shared/image.html?/photos/uncategorized/2012/06/04/002.jpg" onclick="window.open(this.href, '_blank', 'width=800,height=600,scrollbars=no,resizable=no,toolbar=no,directories=no,location=no,menubar=no,status=no,left=0,top=0'); return false"><img height="225" border="0" width="300" src="http://takinx.dcnblog.jp/radio_kit_/images/2012/06/04/002.jpg" alt="002" title="002" /></a> </p>

<p>↑ぼちぼちと進んでます。</p>

<p><a href="http://takinx.dcnblog.jp/.shared/image.html?/photos/uncategorized/2012/06/04/003.jpg" onclick="window.open(this.href, '_blank', 'width=800,height=600,scrollbars=no,resizable=no,toolbar=no,directories=no,location=no,menubar=no,status=no,left=0,top=0'); return false"><img height="225" border="0" width="300" src="http://takinx.dcnblog.jp/radio_kit_/images/2012/06/04/003.jpg" alt="003" title="003" /></a> </p>

<p>↑IFTの緩み留めに、新たな輪ゴムを使用。</p>

<p></p>

<p><a href="http://takinx.dcnblog.jp/.shared/image.html?/photos/uncategorized/2012/06/04/004.jpg" onclick="window.open(this.href, '_blank', 'width=800,height=600,scrollbars=no,resizable=no,toolbar=no,directories=no,location=no,menubar=no,status=no,left=0,top=0'); return false"><img height="225" border="0" width="300" src="http://takinx.dcnblog.jp/radio_kit_/images/2012/06/04/004.jpg" alt="004" title="004" /></a> </p>

<p>↑IFTの合わせ中。<strong>6BY6＋6GH8</strong>でまとめてみました。</p>

<p>トラッキングが残っています。</p>

<p></p>

<p></p>

<p><span style="color: #33cc99;">＊＊＊＊＊＊＊＊＊＊＊＊＊＊＊＊＊＊＊＊＊＊＊＊＊＊＊＊＊＊＊</span></p>

<p>この土曜日。</p>

<p>H77のマザーにXPを入れたらメモリダンプエラーで弾かれたのです。</p>

<p>MEMTEST86をUSBブートさせたら、MEM TESTは綺麗にOK。</p>

<p>近々のマザーボードはWIN7でないと弾くようですね。</p>

<p>オイラ、NT4や<a href="http://ja.wikipedia.org/wiki/Kondara_MNU/Linux">KONDARA</a>で充分なんだけどね、、、。</p>

<p>FDDやMOの資産もあるので、USB-FDDとUSB-MOを慌てて確保しました。</p>

<p>****************************************************</p>

<p><a href="http://takinx.dcnblog.jp/"><span style="font-size: 1.4em;"><strong>TOP PAGE</strong></span></a></p>

<p></p></div>
]]>
</content>


    </entry>
 
</feed>